

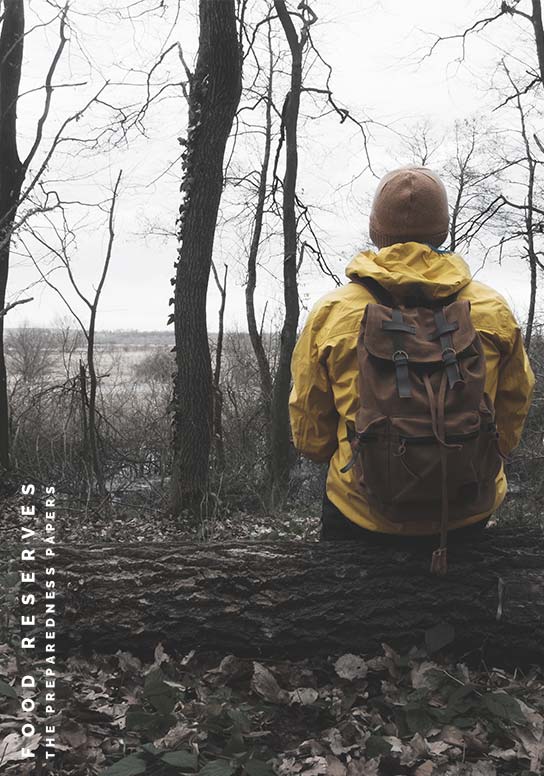

FIRE
In the forest, especially when one is lost, fire (if it is properly controlled) is by far the best friend a man may have. In preparing food, in securing warmth, in providing a cheery security; fire is a necessity. The man who is lost in the woods, for any considerable length of time, will have a hard time of it if he is unable to secure fire. Fire is a tool of such tremendous importance that, to one who has never been in a situation where he has needed it; its value is incomprehensible. As a morale builder, it is unsurpassed. The man who is lost in the deeps of the mountains and forests has half the battle of survival licked when he has obtained fire.
MATERIALS NEEDED TO BUILD A FIRE
If the survivor is unfortunate enough to be without matches, the necessity arises of building a fire by other means. The materials necessary to the building of fire can all be found in the woods. In all cases, one is much more certain of securing fire if pains are taken to get the best materials and to have these materials in the best possible condition. In other words, controllable factors should be brought as close to the optimum as possible.
One of the basic necessities of fire-building is good tinder. Dry grasses, plant stems, dry inflammable bark, dry moss, bird and seed down, punk (a puff-ball sliced and dried makes fair punk); all these make fairly good tinder. In every instance one should be sure that the tinder is dry and free of dirt and that it is made as vulnerable as possible to ignition. Of course, the old standby, charred cloth, should be used if it is available.
FIRE BY FLINT AND STEEL
A hunting knife or an axe or a file should serve nicely in the role of steel for this process. In addition, one will need flint or a suitable substitute such as quartz or Quartzite or any other very hard rock. Flint can be found on many parts of the Ranch and quartz and quartzite are quite common. The best place to look for them is generally along the banks of streams. I have usually found it best to get a hunk of quartz out of the stream and dry it in the sun, and then crack it open to get a rough or sharp edge.
In starting a fire by flint and steel, the tinder is set on a dry surface, free from drafts of wind or drops of water. The flint is then held in one hand and an edge of it is struck sharply with the piece of steel to produce a spark. The flint should, of course, be struck in such a manner as to enable the spark to fall onto the tinder. As the sparks so produced are extremely hot, the tinder, if it is susceptible to high temperature, should catch and the glow should begin to spread. The tinder should then be picked up in the hands and blown gently to increase the size of the glow and to raise the temperature to a point where a blaze will burst forth. When this happens, more tinder should be piled on, followed by small pieces of wood. Bigger and bigger pieces are added until a goodly blaze is secured. If one has no steel, two hard rocks when struck together often produce a spark.
FIRE BY FRICTION
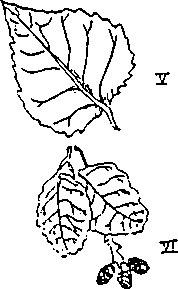
The basic principle behind fire by friction is that when two pieces of wood are rubbed together, the friction produced will be the cause of a high temperature near the burning point. The best woods to be used in fire by friction are: Yucca, Willow, Cottonwood and Aspen (the root preferred) (Figure V). The proper kind of wood when rubbed produces a fine carbon dust. If the wood produces a gritty coarse dust, it should be thrown away and another type used.
Many different methods of using fire by friction have been devised by man. Some of the better methods follow:
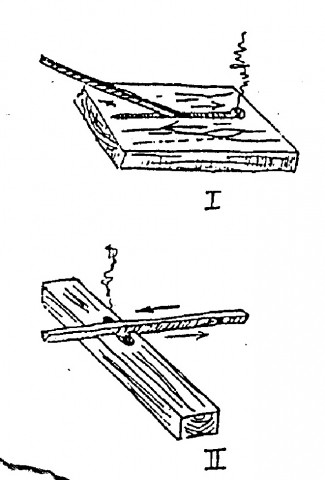
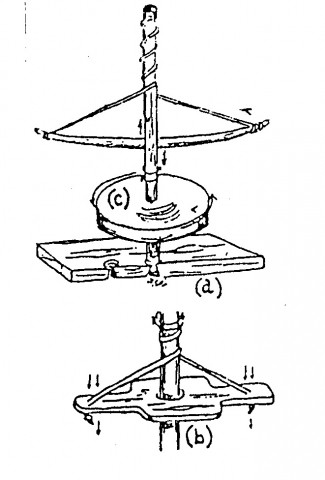
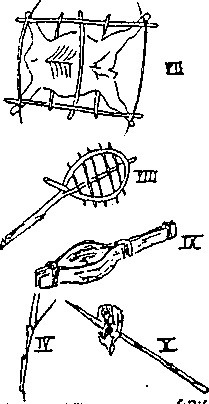
Figure I and II
Fire Plow (Figure I): This method requires plenty of elbow grease. A large piece of good soft wood (about one by two feet) as shown in the drawing, is acquired. A groove is cut in the upper surface and a small hole carved at the end of the groove as shown in the drawing. A second stick, carved to the shape of the groove and a bit harder than the base board, is cut. The process then consists in pushing the stick back and forth (as shown by the arrows in the drawing) and bearing down upon it at the same time thus producing a fine carbon dust and a temperature high enough to ignite it. When the dust begins to glow, it should be gently blown and tinder then placed upon it. The fire plow requires plenty of muscles. It was at one time commonly used by the natives of Polynesia. Figure I and II
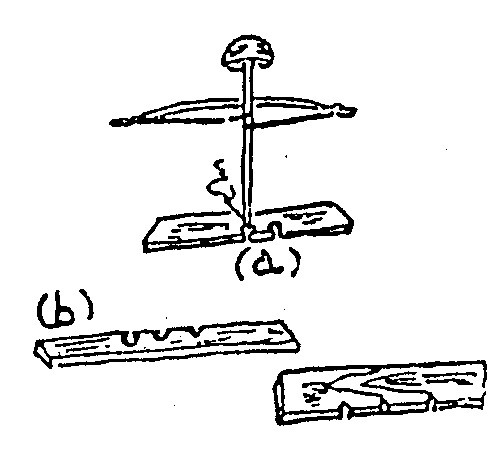
Figure III
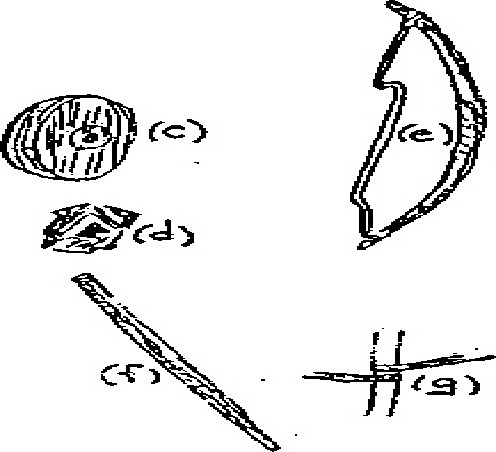
Figure IV
The Saw Set (figure IV): This particular fire by friction set operates quite similarly to the fire plow. In this case, a "ditch" is carved in the board and a "V"-shaped groove is cut across it. The stick, cut to fit the groove, is then placed in the groove and pulled back and forth. An advantage of this friction set is that it can be operated by two persons at one time.
The Bow and Drill Set (Figure III): This method is perhaps the most common and also the best method of fire by friction that there is. The parts constituting this set are:
The Spindle (f): Made of Yucca or other soft wood. It is about 1 ¼ feet long, octagon shaped on the sides and rounded at one end.
The Fire Board (b): Made of the same type of wood as is the spindle. It is ¾ inch thick by 4 inches wide by 12 inches long. Holes are started on the fire board by drilling with the spindle as explained below. After a hollow has been started, a "V"-shaped groove, as indicated in the drawing, is cut. Don't get the "V'-groove too deep or too shallow!
The "Thunderbird" (figures c and d): The "thunderbird" is made of hard wood such as a pine knot, or a stone, etc. If wood is used, a hole is cut large enough to receive one end of the spindle. This hole should be greased to permit free movement of the spindle. The hole should be about ½ inch deep.
The "Bow" (figure e): The bow is a stiff branch about 2 ½ feet long and should be curved. A leather thong is tied to the ends, leaving plenty of slack in the thong, as indicated in the drawing. If a leather thong is not available, some sort of string can be substituted. However, if string is used, the chances of its breaking because of the strain against it are quite large.
After all the parts have been prepared as explained above, the set is put together. First, the leather thong is wrapped about the spindle, as shown in figure (g). The end of the spindle that has not been rounded is placed in the thunderbird and the rounded end of the spindle is placed in the hollow of the fire board (previously, tinder has been placed under the fire board and directly beneath the "V"-groove). The assembled bow and drill set is shown in figure (a).
The fire board is held to the ground so that it will not slip by the left knee and the right foot is set on the board. The thunderbird is then held firmly in the left hand and a little pressure made to bear on it. The right end of the bow is then held in the right hand and drawn slowly back and forth causing the spindle to revolve within the fire board hollow. The friction caused then produces a fine carbon dust in the hollow. This dust, soon smoldering and glowing, falls through the "V-groove onto the tinder below. When this occurs, the tinder is picked up and blown gently until a flame bursts forth.
The "Pump" fire drill (figure III): This method is very similar to the bow and drill described above. There are only two major differences, both of which are calculated to reduce the usual labor required in fire-making. They are:
a. The bow: The pump drill derives its name from the fact that the bow (a), rather than being drawn across as in the bow and drill set; is pushed down. As it is plain to see in the drawing (a), the leather thong is much longer than in the bow and drill set. The purpose will be made clear in the following insertions. A board hollowed out in the center (b) in figure III, may be substituted for the bow. Indeed, it is usually better than the bow.
b. The "wheel", (c) in figure III: The wheel, as shown in the drawing is attached firmly to the spindle. It should be about two inches thick and about 1 ½ feet in diameter. Its purpose is explained below.
OPERATION OF THE PUMP DRILL
The equipment is set up as shown in drawing (a), figure III. The leather thong is twisted about the spindle as shown and the spindle is held steady by using a thunderbird as described under the bow and drill set. It should be plainly seen, then, that when the bow is pushed down, the spindle will revolve. The wheel, also, being attached to the spindle, will revolve. When the leather thong has been pulled until it is nearly straight, the pressure upon the bow should be released, allowing the wheel to continue revolving, thus rewinding the leather thong. The bow is then pushed down again and the process repeated. After the dust has caught, the blaze is started as described under the bow and drill set.
Making fire by flint or steel or by friction is no easy matter, as anyone who has tried it knows. Often it is a process of several hours and much sweat and aching muscles and when a fire is at last gained, you can make sure that it will never be allowed to go out. What a lovely friend is Fire — and how hard she is to gain!!
COOKING METHODS
A great majority of the food gathered in the wilderness requires cooking before it becomes edible or, at least, before it becomes palatable! There are, of course, many methods of cooking foods that are quite satisfactory; among them roasting, broiling, baking, steaming, boiling and infrequently frying.
The easiest method of cooking in survival is, of course, that of roasting. By this method the carcass of the animal is simply thrust upon a stick (figure X) or upon sticks (figure VIII) and held over the coals until done.
Another easy method is that of baking. There are many ways of baking food over or in an outdoor fire. The food can be placed in a mud-pack and then put under the coals to bake, or it can be baked by placing it directly upon the coals. Another method of baking, commonly used for fish, is that of "planking." By this method, the fish is split down the center and tacked (skin side down) to a plank. It is then placed before the fire and basted occasionally until done. It is sometimes good to boil wild meats, especially if they are tough, before baking.
Food can also be steamed by preparing it in an Umu (or Imu, if you prefer). The Umu consist of a pit lined with rocks. A fire is built in the pit and the rocks heated to a great intensity. When this is reached, some of the rocks are removed and food, wrapped in leaves and mud, is placed inside. Rocks are then put over the top and covered with more leaves and dirt; anything to hold in the heat and moisture. It is left to remain in that condition until the food is considered done, usually about two or three hours. Food can be cooked upon flat rocks if any are available.
Perhaps the best, though not the easiest, method of preparing food is that of boiling. There are several important advantages of boiling over other methods. Among them are the facts that (1.) Many foods, especially greens and small bits of food, cannot be satisfactorily prepared by any other method than boiling (2.) by boiling, various foods can be put together and the flavors of the more palatable varieties can permeate the less tasty specimens and (3.) the water in which the food is cooked will serve the dual purpose of retaining most of the vitamins and providing more bulk to put in the belly. Indeed, on survival, it is best even to stew the fruits one is able to gather. A soup made of meat, vegetables, or fruit is hot, filling, and nourishing.
Generally, if one is going to boil a thing, it is necessary to have something to boil it in! A container or utensil of some sort is a prerequisite. Since one does not usually find pots and pans hanging on trees, it is necessary to improvise the container. Unless one is able to find a hollow rock of suitable size and depth, it becomes necessary to make the utensil out of wood or bark. Therefore, a discussion upon how to make these utensils follows, after which we will return to the cooking methods:
Wooden Utensil: Get a log of soft wood, Aspen and cottonwood being the best; lop off one side and hollow the log out, using axe, knife and fire until a suitable size is reached. Although a little tedious to make, I maintain this type of utensil is the easiest to prepare considering the material at hand on the Ranch.
Dark Utensils: The bark utensil has long been a favorite of the Indian in those regions where suitable bark is obtainable. For my own part, however, I have found it difficult to find a tree yielding a bark pliable and workable enough to mold into a satisfactory bark utensil. Nevertheless, with considerable patience and reasonable skill, a suitable bark utensil can be made from native materials. Those trees yielding the most workable bark in this section of the Rockies are the Cottonwood, the Aspen (figure V), the Box Elder (or Ash-leaved Maple); the Rocky Mountain Alder (figure VI) and the Spruces (figure II, page 64). When working the bark, great care should be taken not to crack the bark or form any sort of holes, whatsoever. A good procedure to follow is to soak the bark for several days before using it in order to make it more pliable.
Skin Utensils: After digging a hole slightly larger than you intend the utensil to be, spread a skin over it, peg in the sides to the ground and shove the center of the skin into the hole In the ground, forming a hallow. Add water and heat as related under "Cooking Methods" below.
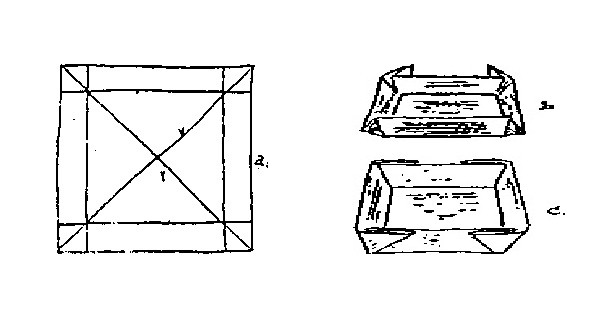
Figure XI Figure XII
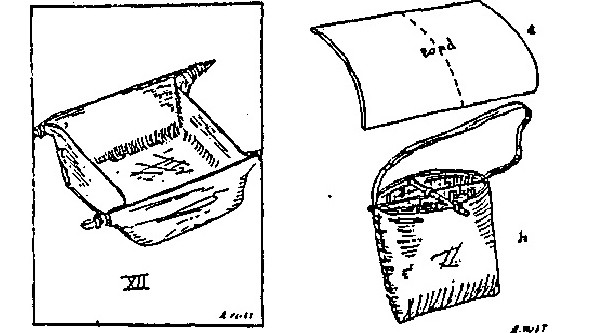
Figure XIII Figure XIV
In figure XI we see the simple "Square" kettle. It is made by creasing the bark on all the lines indicated (excepting the diagonals X and Y) and folding as shown in (b). When it has been properly folded (c), pegs are stuck into the corners to hold them together. Take care not to crack the bark!
Figure XII illustrates the "Seton" kettle, introduced by Ernest Thompson Seton (see bibliography). The procedure . . . one of folding the corners together and binding them . . . should be quite evident from the drawing and need not be elaborated upon further here.
In figure XIV we are shown a pot of my own invention. Though a bit more elaborate than the preceding examples, I have found it fairly satisfactory where a deeper pot is desired. My procedure in making it was to cut off a green aspen log about two feet long and one and one-half, feet in circumference. After I had done this I peeled off the bark carefully and set it aside. Next I cut the log proper down to one-half foot (keeping the bigger end) and cut a "groove" as shown in figure (b). Then I rolled the bark up until it was slightly smaller than the grooved log, overlapping the sides in the process, and bound it with leather or twine. The next step was to place the log in the small end of the bark cylinder and to force it in as tightly as possible. Sometimes pegs as shown in figure (c) can be used.
The final drawing, figure XIII, though it is not a "cooking" vessel, has been included in this chapter for the sake of convenience. It is a fishing basket made by bending a slab of bark (a) in half, binding the sides, adding a cross stick to hold the sides apart and attaching a carrying strap. It is very good for use where one is gathering fruit or greens or where one needs a basket to store trout in while fishing.
Heating the water: The usual method of bringing water to a boil, when using a bark utensil and especially when using a hollow log; is to heat rocks until they are white hot, and then drop them into the water. A pair of tongs and a poker are necessary equipment when using this method. After the rocks have lost their heat, remove them from the water and return them to the fire. Keep adding new rocks to the water. When using rocks, one should avoid those rocks which, when hot, will burst or sliver. They are very dangerous. The best type of rocks to use, are round pieces of quartz gathered from the stream. After they have been properly heated, they will, of course, be quite sterile. The "hot stone" method of boiling water is much faster than the "civilized", external heat, method. I have known it to boil water within three minutes, but it has the disadvantage of not being capable of supplying sustained heat. It does, of course, require constant vigilance. For speed in cooking, it is best to cut the meat and vegetables into small pieces.
Water can be heated In bark utensils by applying external heat, if one is careful to keep the flame below the water line within the utensil.
A final note to add to this chapter is the importance of SALT. Salt is many times unattainable in these mountain regions, although it is generally recognized as a necessity to body health. Since salt is an alkali, a "substitute" can be prepared by boiling water on wood, straining the liquid, and evaporating it to a white, crystalline alkali. It should be used very sparingly. The best substitute for salt is, in reality, sugar.
By accepting you will be accessing a service provided by a third-party external to https://foodreserves.com/