


SKILL DEVELOPMENT OBJECTIVES
The student will be able to: perform a rapid scene assessment and triage of multiple patents, perform a thorough field assessment and body survey of a patient in order to determine the nature of the patient's complaints and injuries, quickly recognize and manage immediate life threatening conditions including choking, no breathing, no pulse, sever bleeding and shock; when necessary, safely extricate a patient from a life threatening environment with recognized techniques including the clothing drag, the blanket drag, the fireman's carry and various two man carry's, perform the following injury management techniques such as the "Heimlich Maneuver" for a choking victim, basic rescue breathing and CPR techniques, effectively apply direct pressure, elevation and indirect pressure to stop bleeding, apply effective bandaging to extremities, splint long bone and joint fractures, seal a sucking chest wound, bandage exposed intestinal organs, treat amputation sites and preserve amputated parts; package patient for transportation using spinal immobilization, log rolling a patient onto a long board and securing a patient for transportation; protection against blood borne pathogens (BBP's) and other contaminants including protective equipment and cleanup or decontamination.
ASSESSMENT
Make sure that more help is on the way. Make sure that the scene is safe for you! Check for the presents of criminals, snakes, drug addicts, spilled chemical, flammables, unstable vehicles or structures, electricity hazards, fuel hazards, carbon monoxide (confined space). How many victims/patients are there? Avoid "tunnel vision"; don't overlook a seriously injured patient while treating another with minor injuries. Determine which patients will need attention first (triage).
Triage in a multiple patient situation is an ongoing process starting with your visual triage as you arrive at the scene and decide what patient looks like he needs help first and again as you assess the patients signs and symptoms to make an informed triage.
Exercise: Students will break into small groups. Each student will have a signs and symptoms card. The group will collectively assess triage themselves and then triage the group for treatment priority.
TRIAGE PRIORITY
FIRST (RED)
Immediate life threatening conditions including: breathing problems, cardiac arrest, heavy bleeding, impending shock, heat stroke, hypothermia, poisoning, diabetic emergencies, open chest and abdominal injuries.
SECOND (YELLOW)
Care is needed, but can wait till more serious conditions are treated. These would include: burns without shock or airway problems, multiple fractures, back injuries and eye Injuries.
THIRD (GREEN)
"Walking wounded" can wait till last for care and can be asked to help with others. These categories would include: minor cuts and bruises, minor burns, strains and sprains and single fractures.
LAST PRIORITY (BLACK)
This is for the dead or dying (FTD) or patients with massive injuries or in profound shock, etc. If you have the resources to comfort these patients, do so, but not at the risk of those you can help.
As you are doing your scene assessment and visual triage (who do I go to first?), take steps to protect against BBP's that you may come in contact with. Put on latex gloves, cover your mouth and nose and cover your eyes. Students practice putting on gloves.
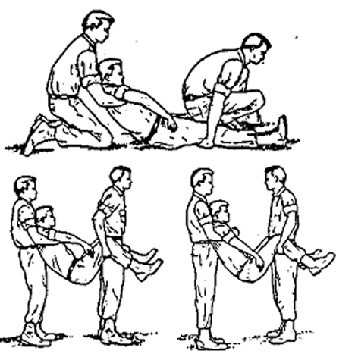
Emergency Extrication
If the scene is unsafe, it will be unsafe or impossible for you to treat the patient in the location; then emergency extrication should be done. Remember that these techniques may cause aggravation of injuries and additional pain.
Exercise: Based on the information on the signs and symptoms cards decide which patients need to be extricated and select and practice the most appropriate technique listed below.
a. Shirt collar drag (1 man)
b. Blanket drag (1 man)
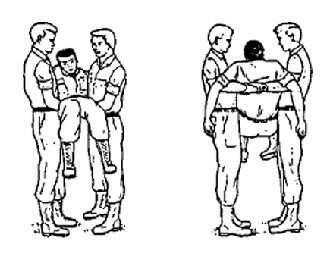
c. For-and-aft carry (2 man)
d. Seat carry (2 man)
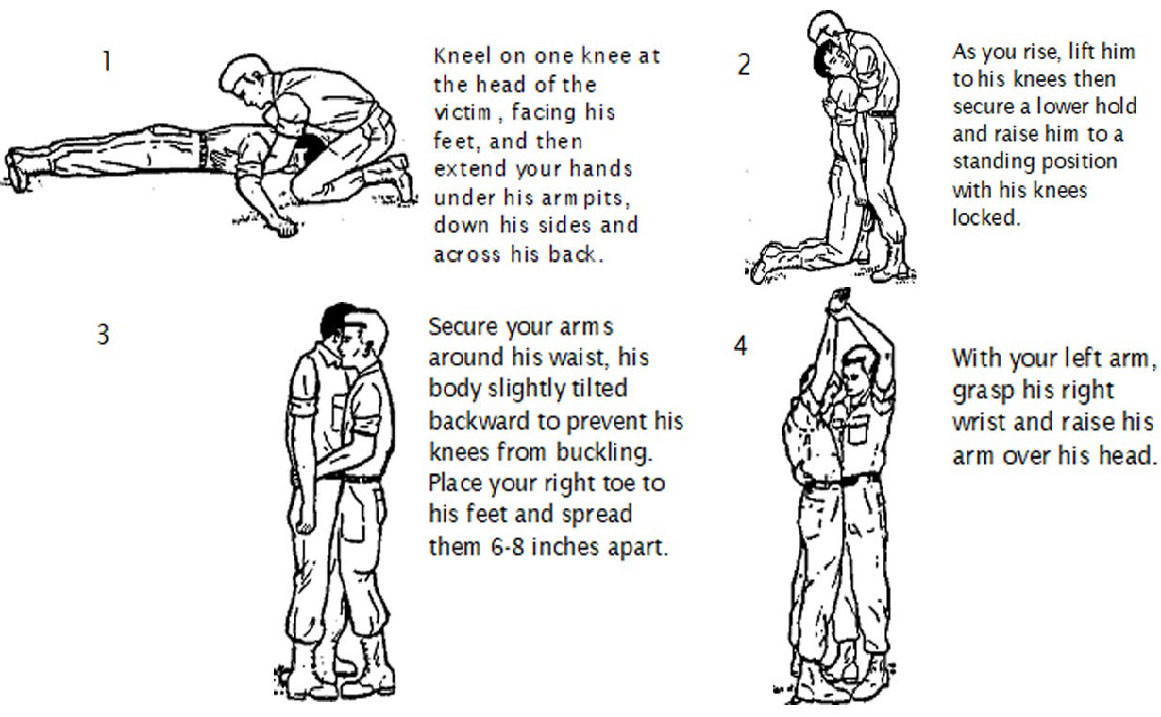
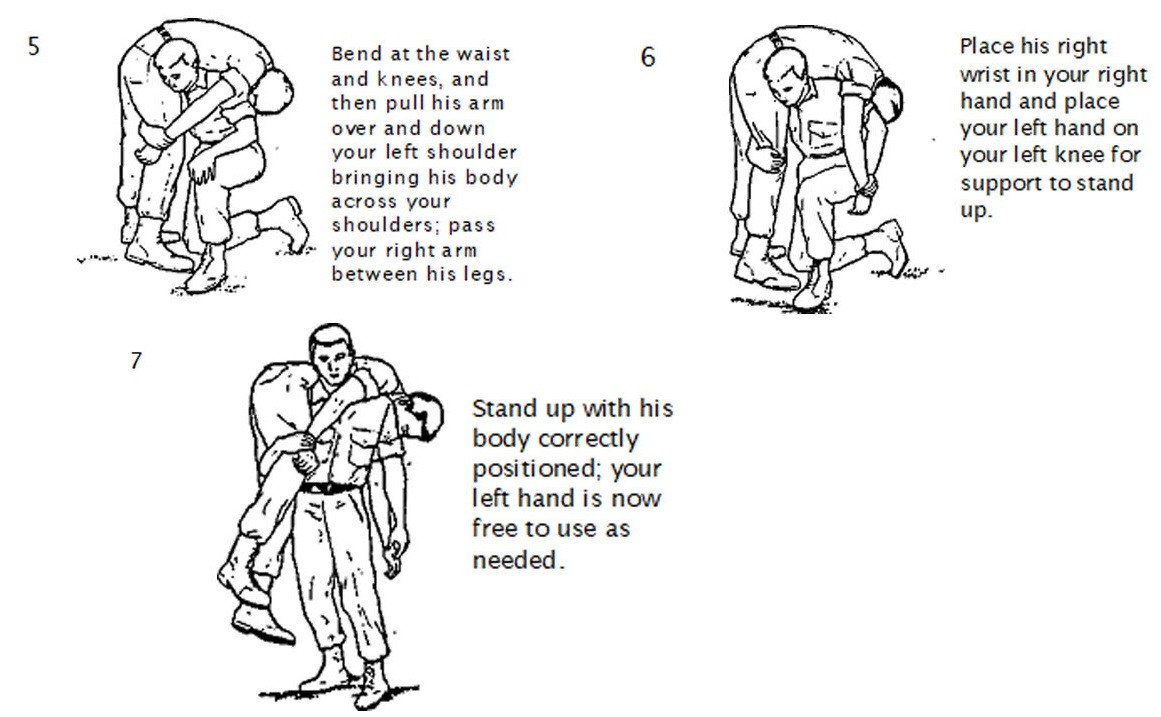
e. Fireman's carry (1 man)
f. Belt drag (1 man)
PATIENT ASSESSMENT STEPS
a. ABCs Airway, Breathing Circulation
b. "Chief complaint" what can they tell you?
c. Vital signs
d. History
e. Full body examination (find every injury)
REMEMBER! (A B C D E x 2)
A ASSESS THE SCENE (Safety)
A AIRWAY (Choking, Obstructions)
B BREATHING (Look, Listen and Feel)
B BLEEDING (Look and Feel)
C CIRCULATION (pulse, skin color)
C CERVICAL SPIN IMMOBILIZATION
D DETERMINE WHAT IS WRONG (signs and symptoms)
D DELIVER APPROPRIATE CARE
E EVACUATE TO SAFETY
E EVALUATE EFFECTIVENESS OF YOUR ACTIONS
PATIENT ASSESSMENT
Having established that 1) the scene is safe, 2) the patient that you need to assess first, 3) that the patient does or does not need to be extricated; having protected yourself against contamination, you can begin the process of assessing what is wrong with the patient in order to effectively treat the problem.
REMEMBER! TREAT EVERY LIFE THREATENING INJURY OR CONDITION YOU FIND BEFORE CONTINUING ASSESSMENT.
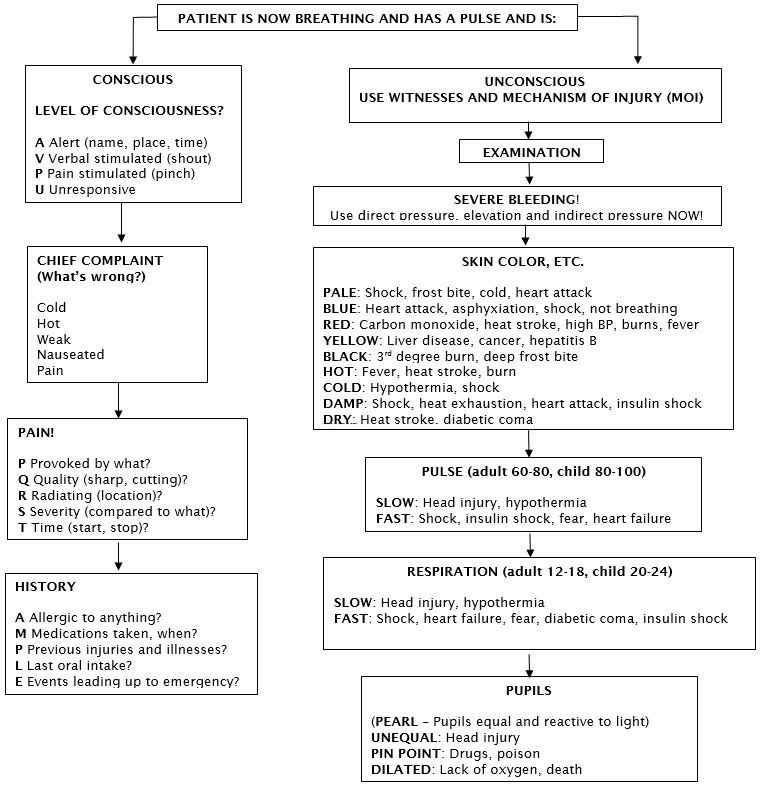
Continue to examine patient from head to toe using your senses of touch, smell and hearing to detect signs of injury such as blood, swelling, tenderness, deformity, bruising, guarding, loss of movement, loss of sensation, posturing, "Raccoon eyes", "Battle signs" or depressions.
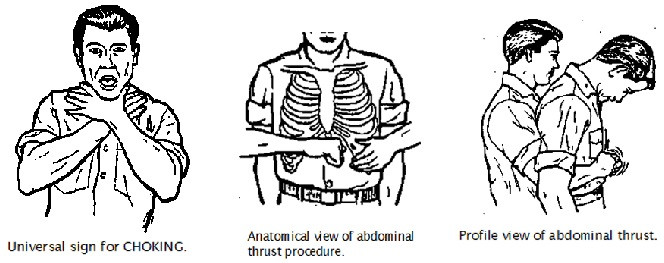
TREATMENT SKILLS TO PRACTICE
Abdominal thrusts (look, breath, sweep, 8 thrusts)
Rescue breathing (1every 5 seconds)
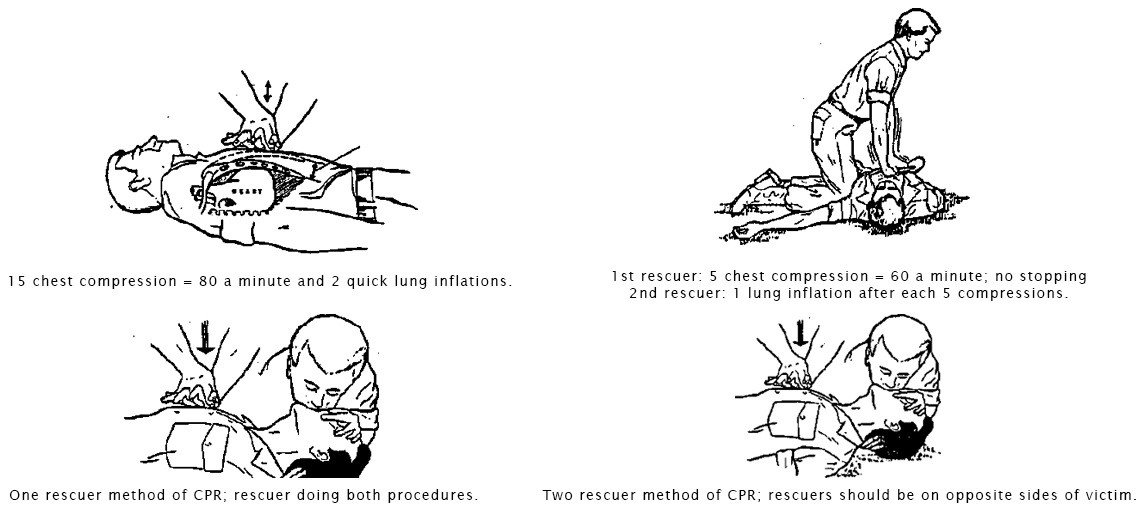
CPR (15 compressions and 2 breaths)
Stop bleeding (direct pressure, elevation, secure compress)
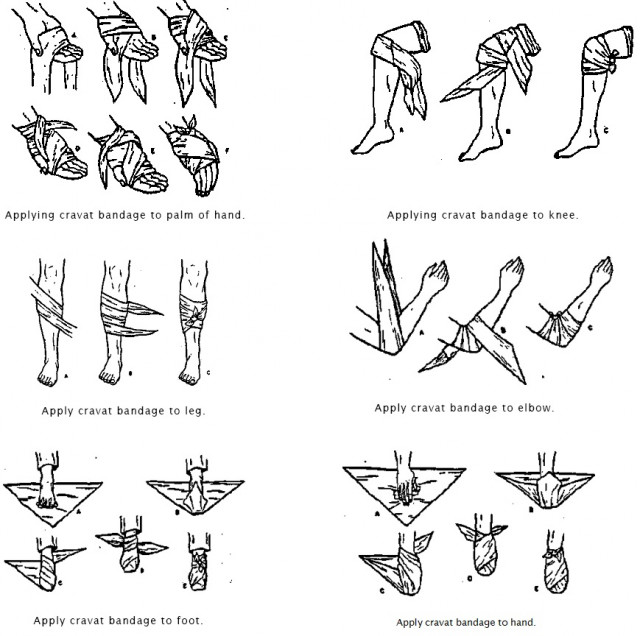
Bandaging the hand
Secure impaled object
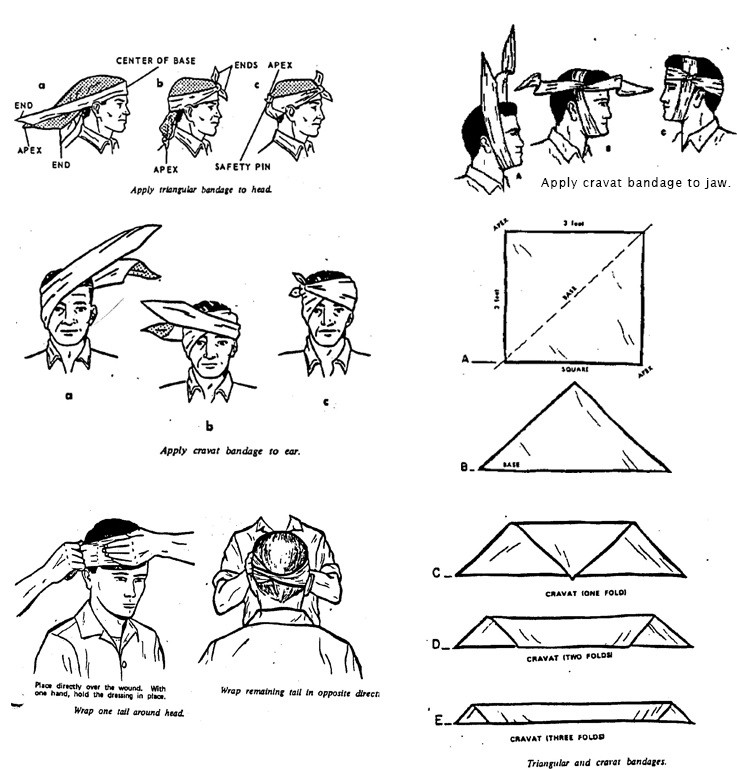
Bandaging the head
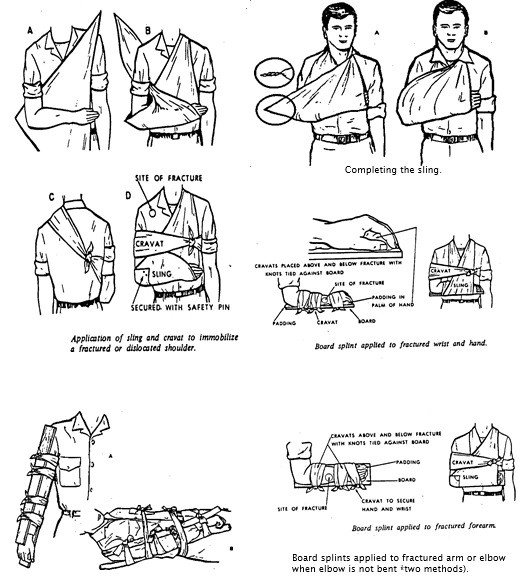
Splint and swath the lower arm
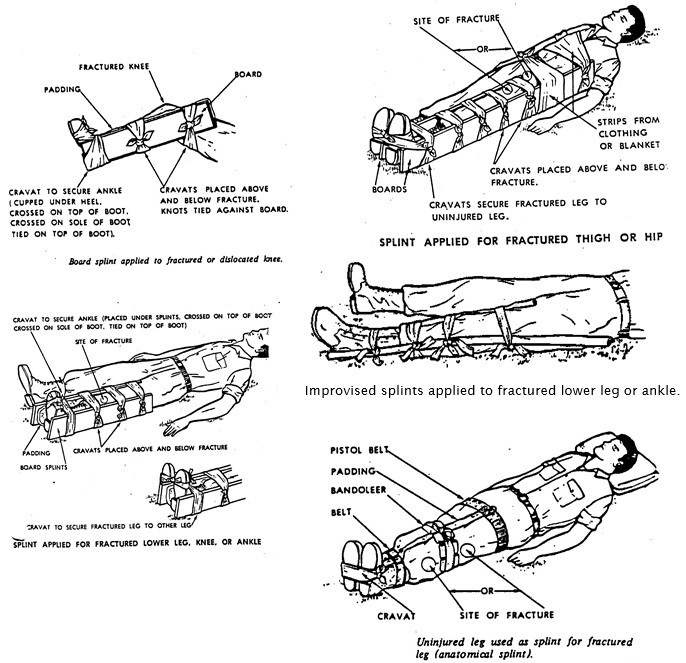
Splint leg
Cover sucking chest wound
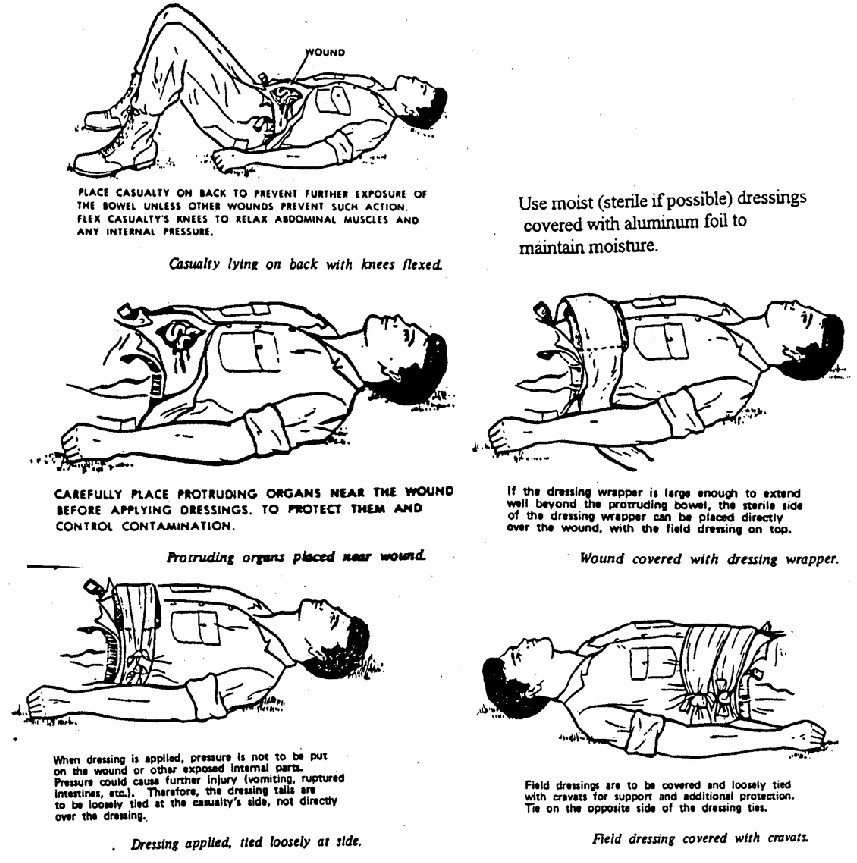
Cover exposed intestines
Cover injured eye
Treat for shock (lie down, elevate feet, keep warm, nothing by mouth)
PATIENT PACKAGING FOR TRANSPORT
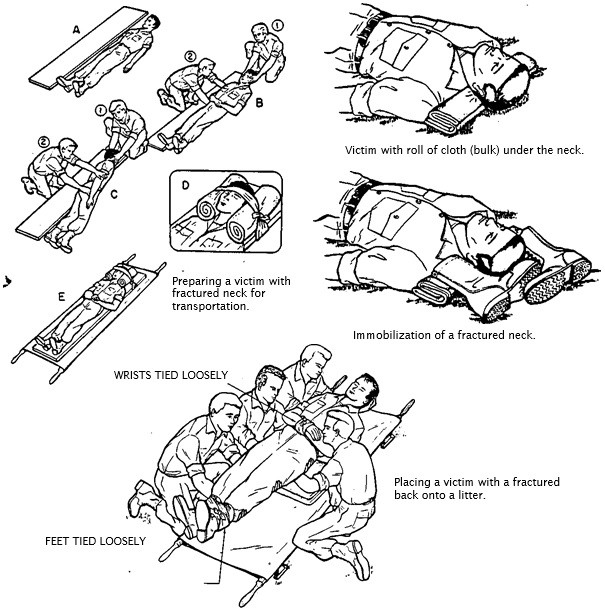
Immobilize the cervical spine
Log role to back board and secure
Log role onto blanket for movement to stretcher, etc.
SIGNS OF DEATH
LIVIDITY: The pooling of blood and fluids in the lower part of the body 15 to 30 minutes after death.
ROGOR MORTIS: Stiffening of body several hours after death
DECOMPOSITION: obvious death
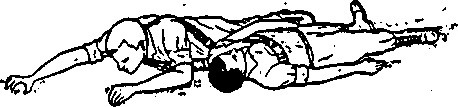
PATIENT POSITIONING
In many situations how a patient is positioned can affect his or her condition and survival. In most cases the patients chosen position (position of comfort) will be the best.
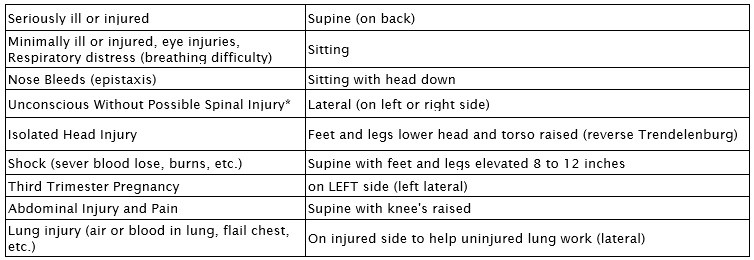
* These patients should be secured to a backboard to protect the spine then tip the board on its side. If the patient is in danger of aspiration of fluids that will compromise the airway and there is no time to use a back board they should be turned on their side with care while someone maintains manual stabilization of the cervical (neck) spine.
MORE FIRST AID INFORMATION
HOW TO ESTIMATE BLOOD PRESSURE
In an emergency situation where you do not have a blood pressure cuff (sphygmanometer) or a stethoscope, you can get a rough estimate of a patient's blood pressure as follows:

NOTE: Anytime that a patient has a systolic blood pressure less than 80 mm/hg or less than 100 mm/hg with any signs or symptoms of shock; TREAT FOR SHOCK!
SPLINTING GUIDE
1.Before splinting, check for circulation (pulse and capillary refill), ability to move and sensation below the injury.
2. If a long bone fracture, splint the joint on both sides.
3.In general it is best to splint an injury as you find it, avoiding any additional movement that will cause more damage and pain. For dislocations the patient will almost always be in the best (most pain free) position, so splint it that way.
4.If a joint injury (sprain, dislocation, etc.), splint the bone on both sides.
5.Always pad the splint.
6.Do not cover bandaged wounds or pulse points.
7.If necessary, use the body as a splint (e.g. leg to leg, arm to chest, etc.).
8. DO NOT STRAIGHTEN A FRACTURE UNLESS THERE IS NO CIRCULATION BELOW THE INJURY.
9. Cover exposed bone ends with sterile dressing.
10. After splinting (and bandaging), recheck for circulation below the injury. If no circulation, redo the splint.
11. It normally takes two people to splint: one to hold and one to splint.
TWO HANDED SEAT CARRY
With victim lying on his back, a bearer kneels on each side of his hips. Each bearer passes his arms under the victim's thigh and back and grasps the other bearer's wrists; the bearer's stand up, lifting the victim.
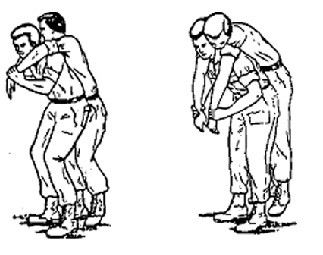
PACK STRAP CARRY
Lift the victim from the ground the same way as the Fireman's Carry by supporting him with your arms around him and grasping his wrist closest to you and place his arm over your head and across your shoulder. Move in front of him while supporting his weight against your back; grasp the other wrist and place his arm over your shoulder. Bend forward and hoist him as high on your back as possible so that all his weight is resting on your back.
TWO MAN FORE AND AFT CARRY
One bearer spreads the victim's legs, kneels between the legs with his back to the victim and positions his hands behind the knees. The other bearer kneels at the victims head, slides his hands under the arms and across and locks his hand together. The bearers stand together lifting the victim.
THE PISTOL BELT DRAG
Extend two pistol belts, or similar objects, to their full lengths and join them together to make a continuous loop. Roll the victim on his back. Pass the loop over the victims head and position it across his chest and under his armpits; then cross the remaining portion of the loop forming a figure "8". Lie on your side with back away from victim, resting on your right elbow. Slip the loop over your right arm and shoulder and turn onto stomach, dragging the victim as you crawl.
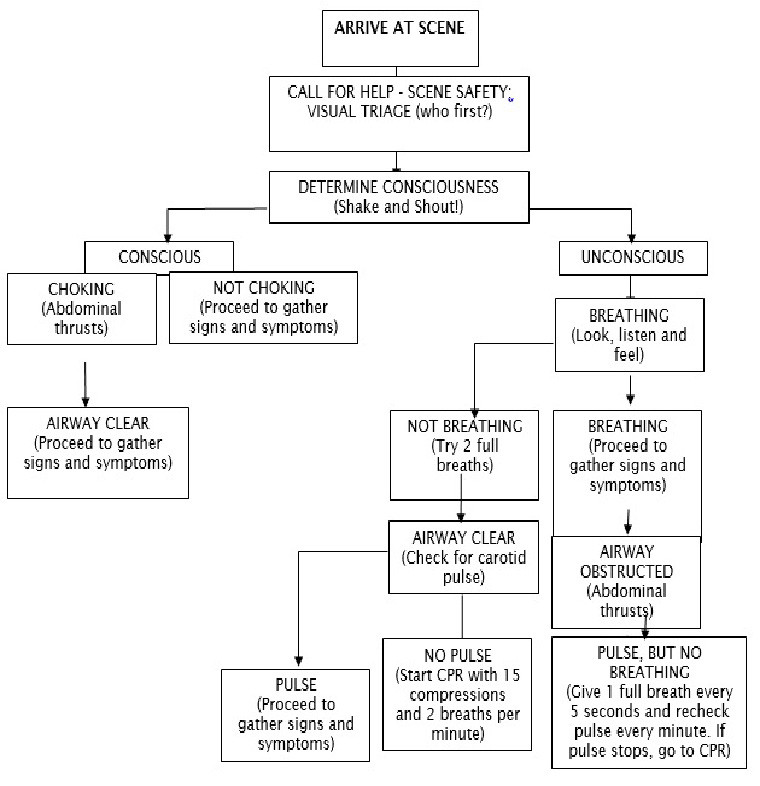
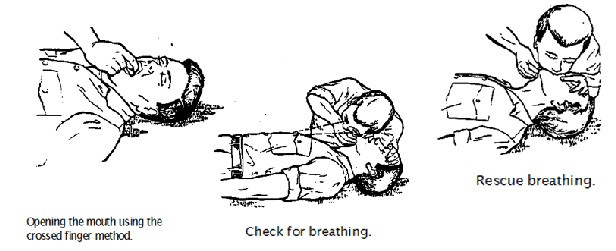
FAST FIRST-AID SKILL SHEET # 3 – CLEARING A BLOCKED AIRWAY AND RESCUE BREATHING
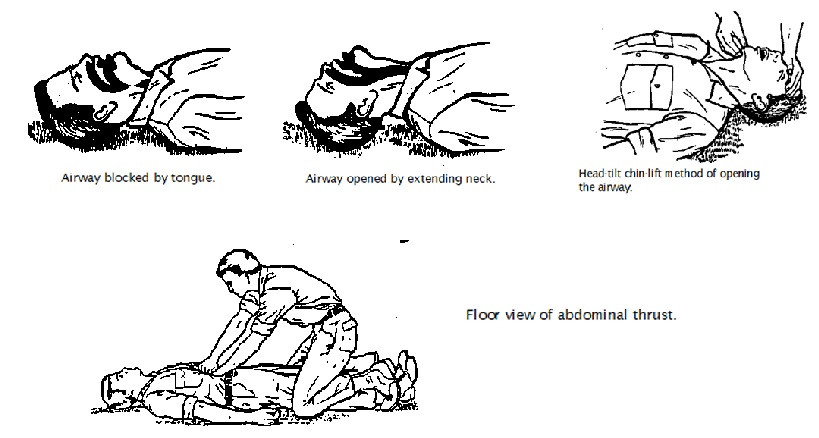
When airway is clear, give 2 full breaths then check for pulse. If there is a pulse, but no breathing; give 1 breath every 5 seconds.
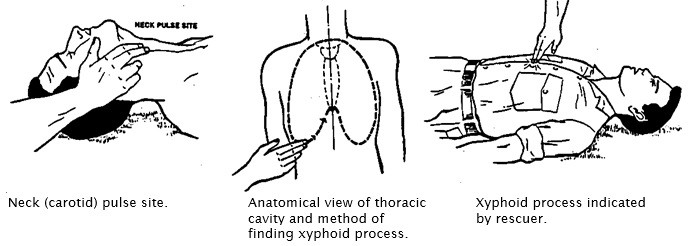
FAST FIRST-AID SKILL SHEET # 4 – CARDIOPULMONARY RESUSCITATION (CPR)
HAS PULSE, BUT NOT BREATHING
Give one full breath every 5 seconds and recheck pulse every minute. If pulse stops, go to CPR.
Rescuer giving chest compressions.
FAST FIRST-AID SKILL SHEET # 5 – STOP BLEEDING AND TREAT FOR SHOCK
Use direct pressure first, then elevation, then indirect pressure on the pulse point above the injury.
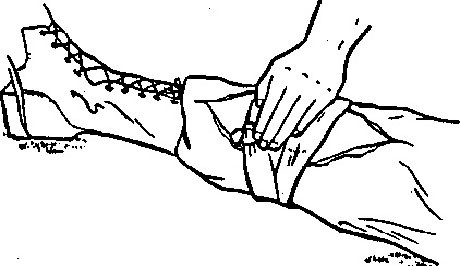
Direct manual pressure.
Tails tied into a knot.
FOR SHOCK
Lie patient down, raise feet, keep warm and don't give anything by mouth.
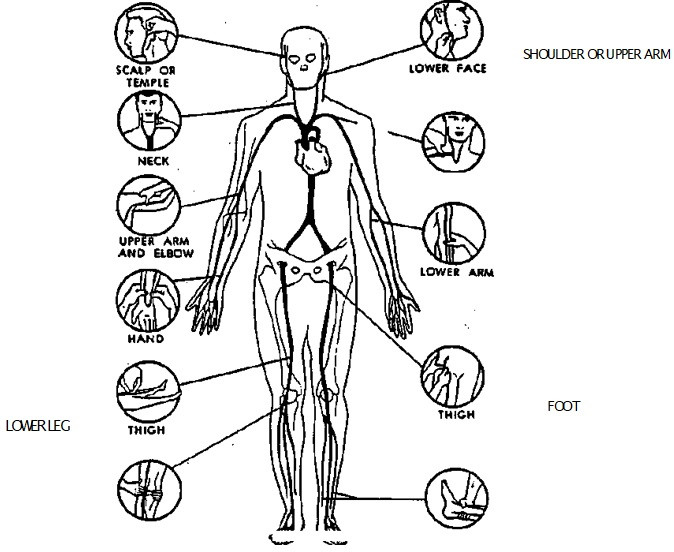
If blood is spurting from wound (artery), press at the point or site where main artery supplying the wounded area, lies near skin surface or over bone, as shown. This pressure shuts off or slows down the blood flow from the heart to the wound until a pressure dressing can be applied. You will know you have located the artery when you feel a pulse.

Loosen clothing and elevate feet.
Place cover over and under victim.
FAST FIRST-AID SKILL SHEET # 7 – BANDAGING THE HEAD
FAST FIRST-AID SKILL SHEET # 8 – SPLINTING THE ARM
FAST FIRST-AID SKILL SHEET # 9 – SPLINTING THE LEG
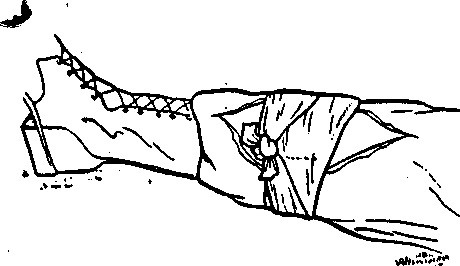
FAST FIRST-AID SKILL SHEET # 10 – BANDAGING A SUCKING CHEST WOUND
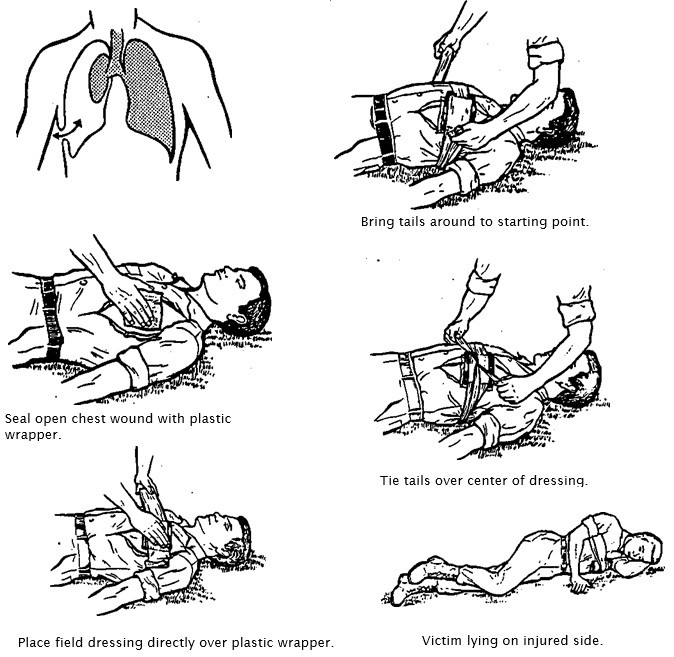
If the patient has increasing difficulty breathing with progressively shorter breaths, distended neck veins and hypoxia, the seal must be removed. Consider taping the plastic down on just three sides to make a one way valve.
FAST FIRST-AID SKILL SHEET # 11 – BANDAGING EXPOSED INTESTINES
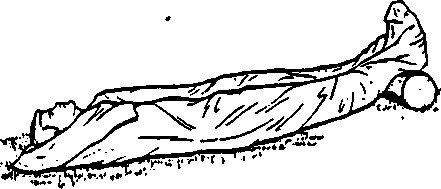
FAST FIRST-AID SKILL SHEET # 12 – PACKAGING A VICTIM FOR TRANSPORT
FAST FIRST-AID SKILL SHEET # 13 – PROTECTING FROM BLOOD BORNE PATHOGENS (BBP)
NOTE: "Blood Borne Pathogens" may be present in blood, urine, feces, vomit and in some cases saliva.
The most dangerous and contagious pathogens are: Hepatitis B (HBV), a liver disease that can lead to death and Human Immunodeficiency Virus (HIV), which leads to Acquired Immune Deficiency Syndrome (AIDS); a fatal condition. Other diseases that are communicable include: Hepatitis A (less dangerous), Herpes, Meningitis, Tuberculosis, Measles, Mumps, Gonorrhea, Syphilis and Influenza.
New viruses are being introduced as international travel increases and terrorists are known to have access to very contagious and deadly viruses.
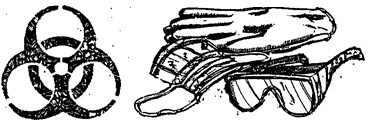
PROTECTIVE EQUIPMENT: Latex gloves, mouth and nose mask, eye protection. Have a good disinfectant and hand soap for decontamination.
ROUTES OF ENTRY FOR PATHOGENS
BBP's are communicable through respiration, injection, mucus membranes, eyes, nose, mouth and open wounds.
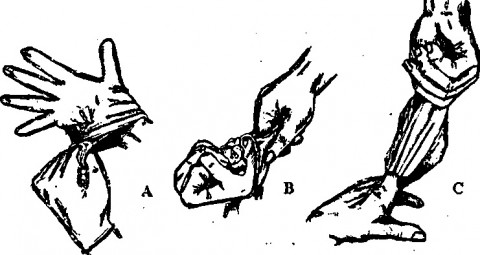
GLOVE REMOVAL
You must follow a safe procedure for glove removal, being careful that no pathogens from the soiled gloves contact you hands. With both hands gloved, peel one glove off from top to bottom and hold it in the gloved hand. With the exposed hand, peel the second glove from the inside, tucking the first glove inside the second. Dispose of the entire bundle promptly. Remove gloves when they become contaminated, damaged or before leaving the area. Wash your hands thoroughly. DISPOSE OF OR DECONTAMINATE EVERYTHING!
By accepting you will be accessing a service provided by a third-party external to https://foodreserves.com/