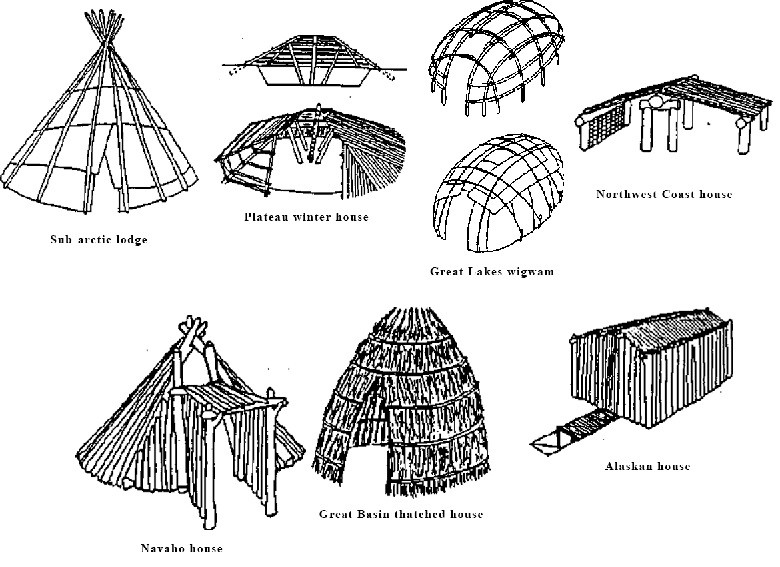
KINDS OF SNOW SHELTERS
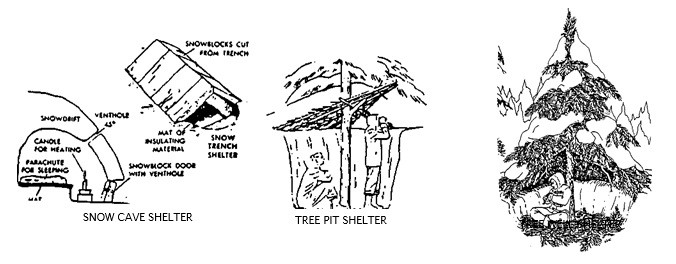
The hole-in-the-snow shelter is designed to capitalize on the insulating quality of snow and the sheltering effect of the tree. This is a good type of shelter to rig when it's not possible to build a fire.
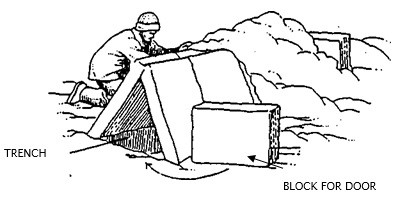
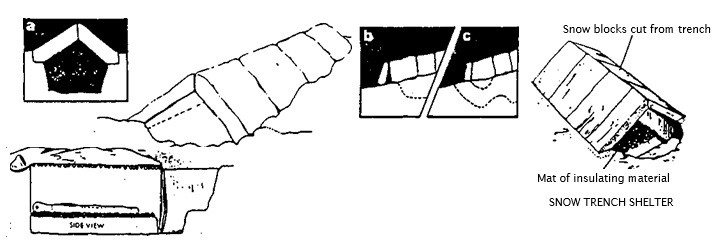
The snow trench as a shelter is a good option in open regions such as ice packs or where there is hard-packed snow. To build the snow trench, stomp or cut out a trench. Then, using a large knife or saw, cut slabs of ice or packed snow and arrange as shown. Loose snow may be packed over the slabs to provide further insulation.
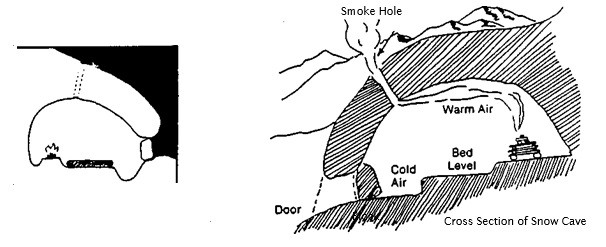
A snow cave should be built only when no other shelter is available because a great amount of energy and skill is required for construction. While snow caves can be reasonably warm as a result of the insulating quality of snow, if you increase the inside temperature much above freezing, you increase humidity and cause melting. Even a candle can raise the temperature enough to cause some melting.
ARTIC SHELTER
In polar areas, simple shelters will be those already waiting for you in natural caves and hollows. If you carry some kind of bivouac in your equipment, you can erect it and increase its protection by piling up loose snow around and over it, so long as it can support the weight. But to build in hard snow and at very low temperatures, snow will be solid; you need some kind of implement to cut into it or make blocks from it. Spades and ice saws are essential equipment for polar expeditions.
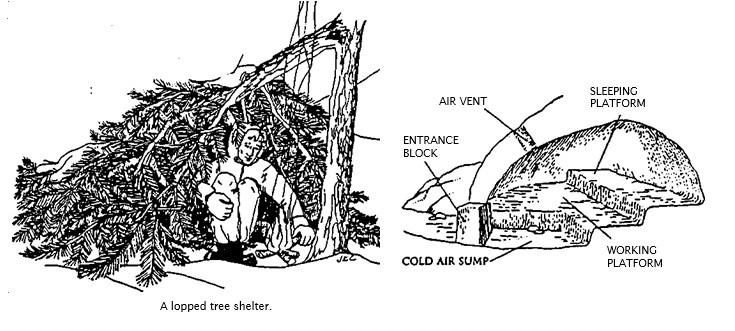
Snow or rock caves will be easily recognizable—but not so obvious are the spaces left beneath the spreading boughs of conifers in the northern forests when the snow has already built up around them. A medium-sized tree may have a space right around the trunk (a) or a large one have pockets in the snow beneath a branch (b). Try digging under any tree with spreading branches on the lee side.
SNOW CAVE
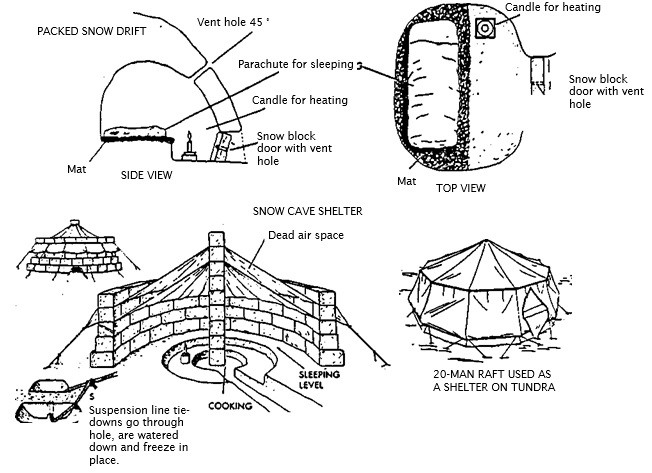
Dig into a drift of firm snow to make a comfortable shelter. Make use of the fact that hot air rises and heavier, cold air sinks. Create three levels inside: build a fire on the highest, sleep on the centre one and keep off the lower level which will trap the cold. Drive a hole through the roof to let out smoke and make another hole to ensure that you have adequate ventilation. Use a block of snow as a door and keep it loose fitting and on the INSIDE so that it will not freeze up and jam. If it does, a block on the inside will be much easier to free. Smooth the inside surfaces to discourage melt drips and make a channel around the internal perimeter to keep them away from you and your equipment.
Anchor a ground sheet or poncho along the top with another course of blocks; use others to secure the bottom edge. Use more snow blocks to close the sides.
Even soft snow can be built into a windbreak. Those with equipment can cut blocks (c). This is the minimum shelter for the minimum effort.
The snow cave can be made out of a snow drift hollowed out for a couple of Individuals. It takes considerable work to do this, but survival may make it necessary. Start low on the drift, dig in, and then up. Follow the diagram. Caution: Snow caves are not to be considered as permanent shelters, but for temporary, one-night occupancy, to protect one from the elements. In a long-term situation, snow caves deteriorate from the warm air inside and can collapse. If possible, choose a north slope, out of the sun or build in shaded areas to prevent major shrinkage.
BUILDING IN SNOW
A saw, knife, shovel or machete is necessary to cut compacted snow into blocks. The ideal snow will bear a man's weight without much impression being made, but be soft enough to allow a probe to be inserted evenly through it. Cut blocks about 45 x 50cm (18 x 20in) and 10-20cm (4-8in) thick. These will be an easy size to handle, thick enough to provide good insulation and yet allow maximum penetration of the sun's rays.
SNOW TRENCH
This is a much quicker shelter to construct than trying to build in snow above the ground, but it is suitable for only one person and then only for short-term use, while you are on the move or making something bigger, for example. Mark out an area the size of a sleeping bag (including head support) and cut out blocks the whole width of the trench. Dig down to a depth of at least 60cm (2ft). Along the top of the sides of the trench cut a ledge about 15cm (Gin) wide and the same deep. Rest the snow bricks on each side of the ledge and lean them in against each other to form a roof (a). Put equipment below your sleeping bag so that you are not in direct contact with the snow beneath.
Block the windward end with another block or piled up snow. At the other end (downwind) have a removable block as a door (b), or dig an entrance (c). Fill any gaps with snow. Most effective build on a slight slope, cold air will collect in the entrance leaving warmer air in the sleeping space. Enter your text here ...
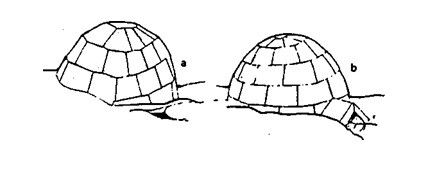
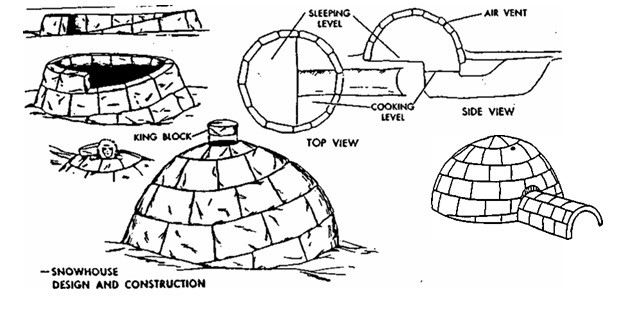
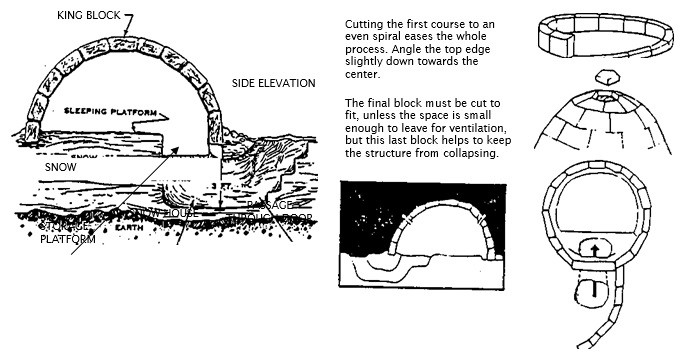
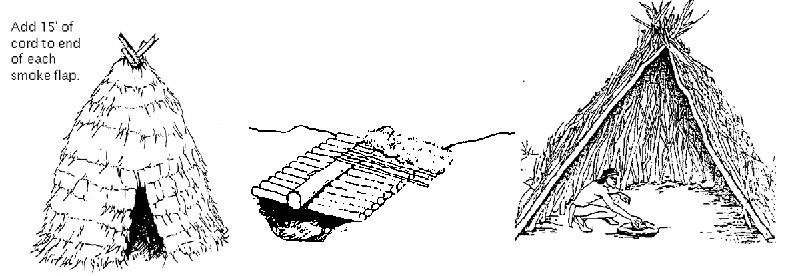
SNOW HOUSE (IGLOO) An igloo takes time to construct, but centuries of use by the Eskimo demonstrate its efficiency. Build the main shelter first then dig out an entrance or build an entry tunnel which is big enough to crawl along. Make sure that its entrance does not point into the wind. You could bend the tunnel or build a wind break-to make this less likely. Mark out a circle on the ground about 4m (13 ½ ft) in diameter and tramp it down to consolidate the floor as you proceed with the rest of the building. Cut and lay a circle of blocks on the perimeter. Be prepared to dig a tunnel (a), leave a space for an entrance (b). Place another layer on top of them but, as when laying bricks, centre new blocks over the previous vertical joint.
Build up more layers but place each only halfway over the lower tier, so that the igloo tapers in or becomes dome-shaped. Shape out the entrance arch as you proceed. Seal the top with a flat block. Make ventilation holes near the top and near the bottom (not on the side of the prevailing wind or so low that snow rapidly builds up and blocks it. Fill any other gaps with snow. Smooth off the inside to remove any drip-points. This will allow any condensation to run down the wall instead of dripping off.
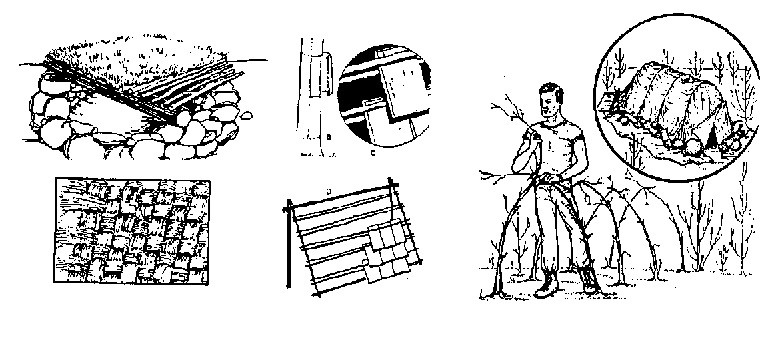
A house built of snow blocks is a useful semi-permanent refuge for two or more survivors. The construction of a snow house, however, requires considerable experience and practice. The emplacement of the blocks in this type structure is critical since the blocks are supported by three impinging corners, the two bottom corners and the top. The support of three corners, aided by the downward slope of the inclined plane, is the only "mystery" in snow house construction. Crevices between blocks are stuffed with triangular pieces of snow and finished off with soft snow gently rubbed in with a mittened hand. The snow functions as a hinder and becomes stronger than the original snow blocks. A drawback in constructing this type shelter is the need for tools; knife, saw, or axe. It has been proven by Eskimos that with a knife you survive, without it you need a miracle.
IGLOO(SPIRAL METHOD)
Lay the first course of blocks and then shape them to the required spiral. You do not have to overhang the blocks if you angle your initial spiral downwards and inwards and shape the top and bottom faces of subsequent courses to lean inwards. The last few blocks in the centre may need some support as you fit them into position. Cut an entrance way through the lower course of blocks or dig a tunnel beneath them. The central hole can be used as an entrance if you are too exhausted to complete the structure.
INSIDE YOUR IGLOO
Build a sleeping level higher than the floor or dig down when building to create a lower cold level, which can be used for storage.
DESERT SHELTER
In the desert you will need shelter mostly from sun and heat. Use whatever natural shade you can find, such as a cave, rock ledge, or wall of a dry stream bed. A dry canyon in the desert is a dangerous camping ground; cloudbursts may cause sudden and violent floods which sweep along a dry valley in a wall of roaring water. Don't use the inside of the airplane for shelter in the daytime, it will be too hot. Get under the shade of a wing if you have no other shelter. If you stay with the airplane, you can make a good shade-shelter by tying a spread-out parachute as an awning to the wing. Leave the lower edge at least 2 feet clear of the ground for air circulation. Use sections of airplane tubing for tent poles and pegs. If the airplane is not available, make a shelter of your parachute. Two layers of cloth separated by several inches of air space are cooler than a single thickness. In winter months and especially at night, desert temperatures may drop to freezing and heavy rains may sometimes occur. Use the inside of the airplane for protection from cold and rain. Do your cooking outside to prevent carbon monoxide poisoning.
Note: If you camp or travel in a desert canyon or dry river beet, be prepared for a quick exit. Cloud bursts, although rare, do cause sudden and violent floods which sweep along a dry valley in a wall of roaring water.
Note the shelter using a double layer of material to improve insulation. The same technique may be used in cold weather.
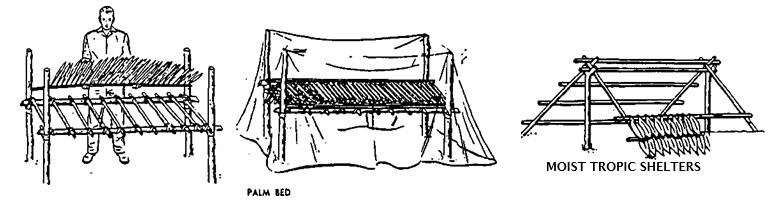
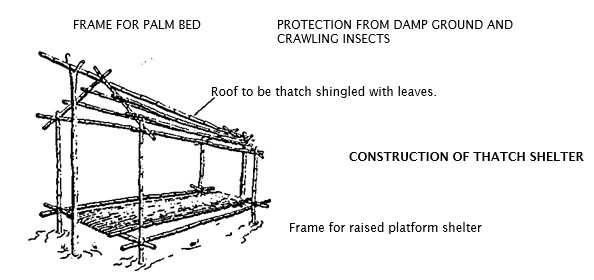
TROPICAL SHELTERS
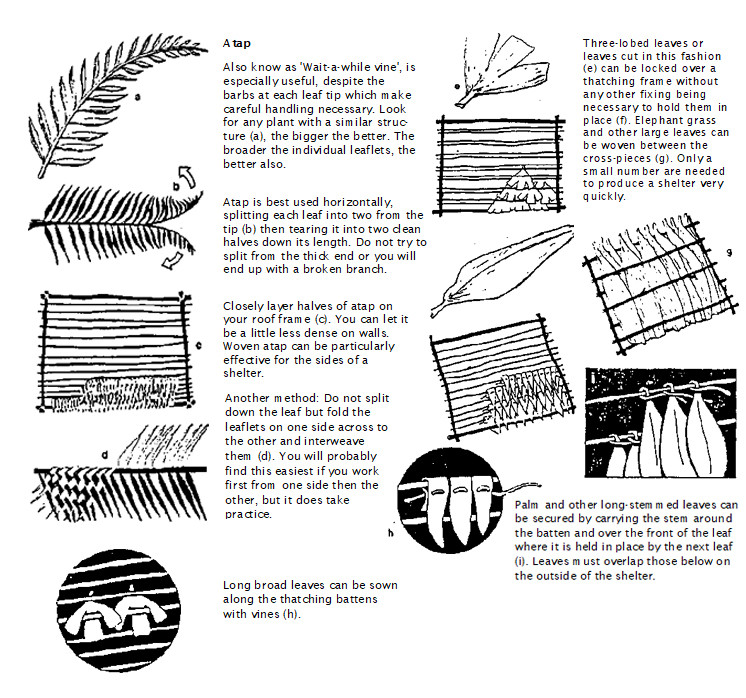
In rain forests and tropical jungle, the ground is damp and likely to be crawling with insect life; leeches and other undesirables. Instead of bedding down on the ground you will be better in a raised bed. Consequently you may want to make higher shelters, unless you are at an altitude high enough to make the nights cold, you will be less concerned with protection from the wind than with keeping reasonably dry. A thatching of palm, banana and other large leaves makes the best roofs and walls.
BAMBOO
This large-stemmed plant, actually a grass, is a very versatile building material and can be used for pole supports, flooring, roofing and walls. The giant form of bamboo, which can be over 30m (100ft) high and 30cm (1ft) in diameter, is an Asian plant, found in damp places from India through to China both in the lowlands and on mountain slopes, but there are types native to Africa and Australia and two which are found in the southern United States.
Lay the thatch shingle-fashion, with the tips of leaves pointing downward, starting from the bottom and working up, to shed the rain. Dig a small drainage ditch just inside the eaves of your shelter and leading downhill; it will help keep the floor dry.
The type of shelter you select should be based on several factors:
1. Shelter material you have with you (tent, vehicle, canoe, airplane, tarp, emergency blanket, sheet of plastic, parachute).
2. Equipment you have such as an ax, saw, knife and/or rope.
3. Natural materials available for shelter construction like rocks, trees, poles and snow.
4. Current and expected weather conditions.
5. Season of the year.
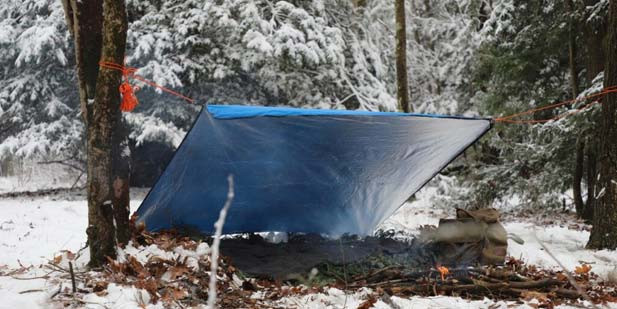
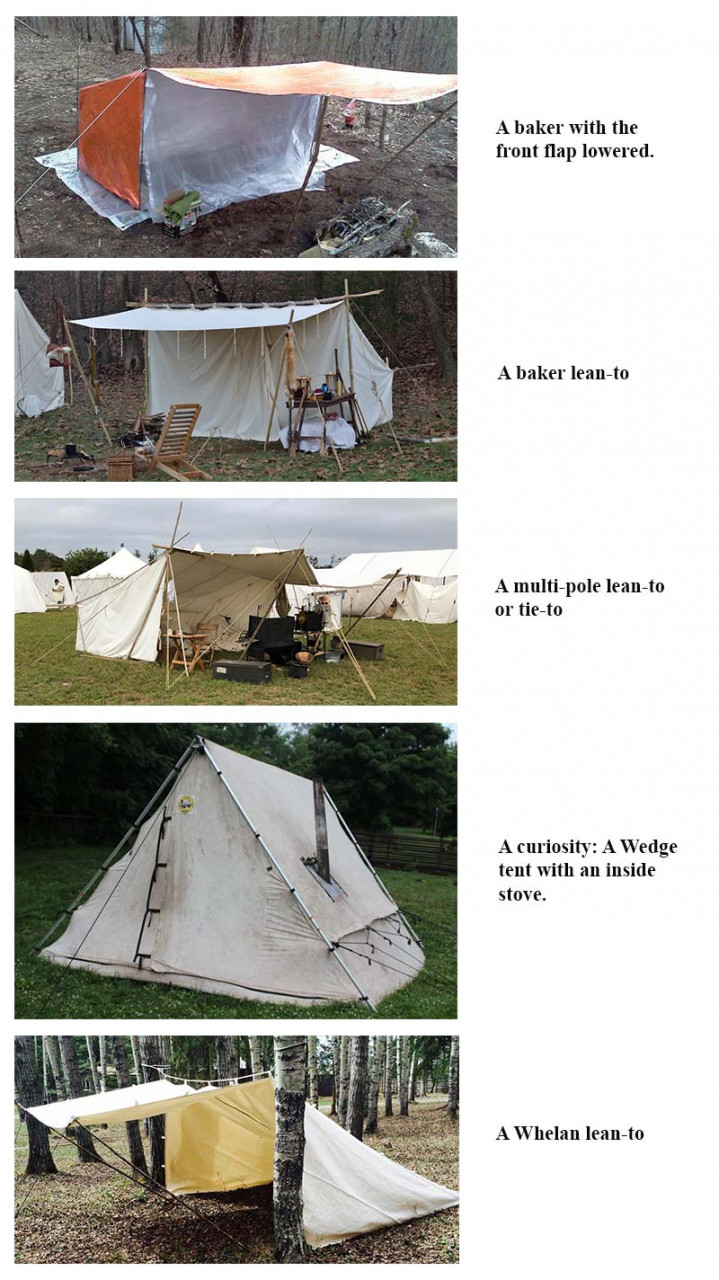
SHELTERS FROM TARPS
Tarps may be used to create shelters of widely varied design.
Waterproofing: Nylon tents will leak along the seams where holes have been made by the needle in stitching. It is a good idea to seal these areas before use. Sealant comes in paste, liquid, or spray.
Airing: Every tent should be kept dry whenever possible. Be sure your tent is well dried and aired before storing for more than a day or two. At home, store the tent in a dry, cool place out of the sun. Roll it up loosely in a box or bag. Sunlight (ultraviolet rays) tends to weaken nylon in time.
Cleaning: Always keep your tent clean. Grit and dirt not only contribute to discomfort; they can seriously wear away at the delicate materials of your tent. Always clean your tent when your trip is over, shaking it out and wiping it or washing it by hand.
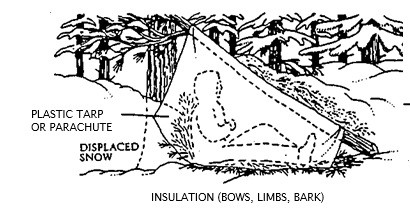
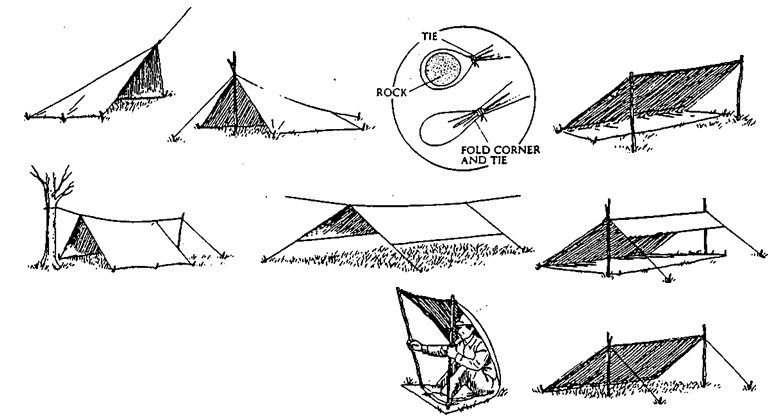
SHELTER SHEET
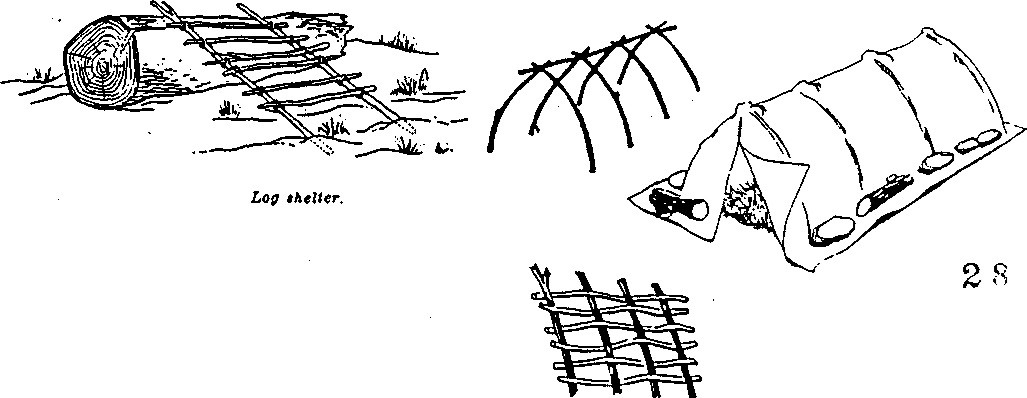
With a waterproof poncho, groundsheet or a piece of plastic sheeting or canvas, you can quickly and easily make a number of different shelters which will suffice until you can build something more efficient. Make use of natural shelter (a) or make a triangular shelter with the apex pointing into the wind (b). Stake or weigh down edges. If it is long enough, curl the sheeting below you — running downhill so that it keeps out surface water (c). Use dry grass or bracken as bedding. Do not lie on cold or damp ground.
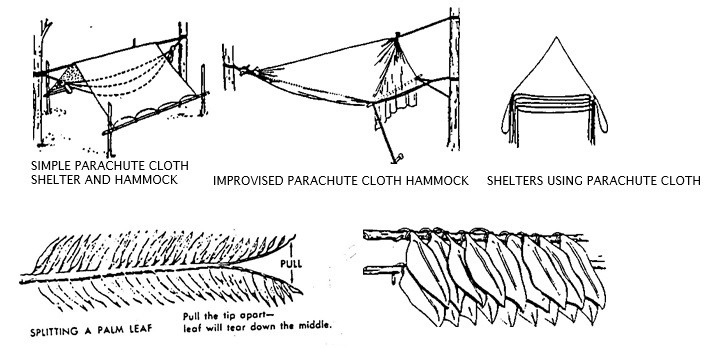
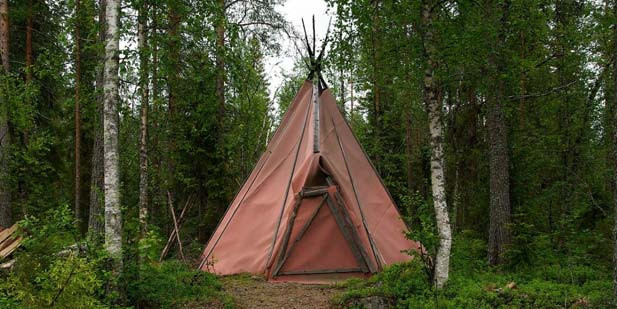
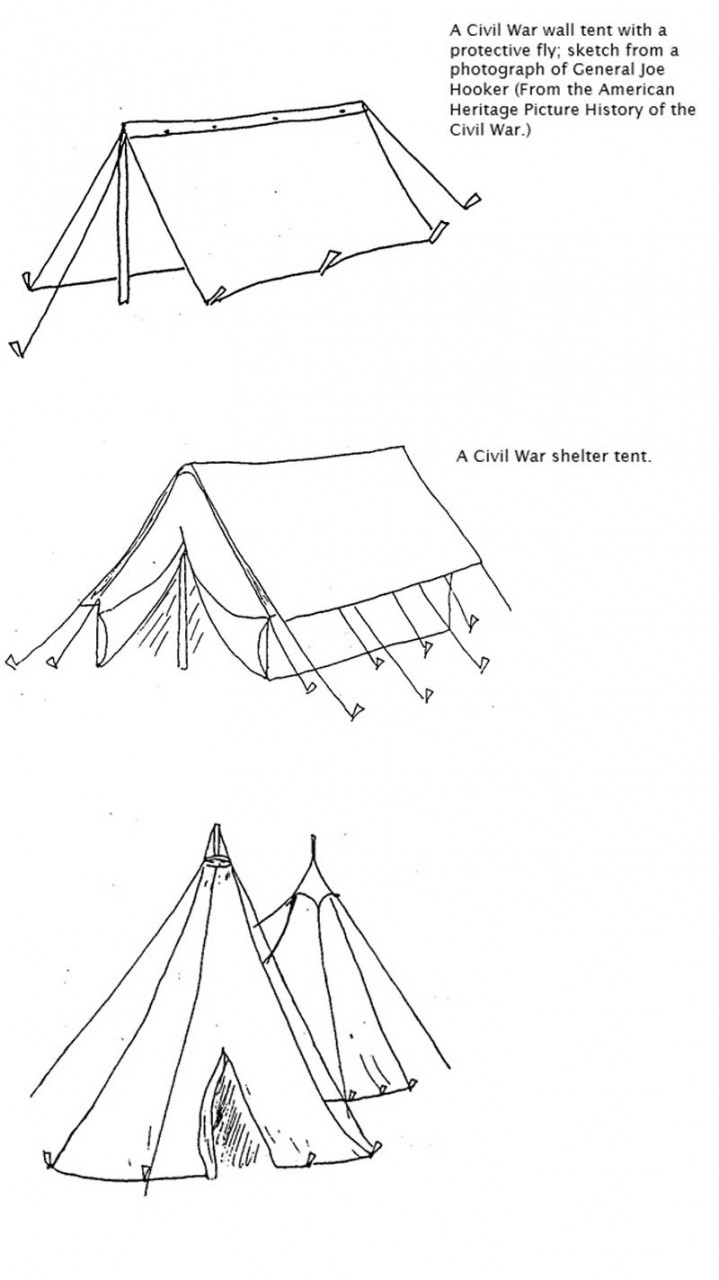
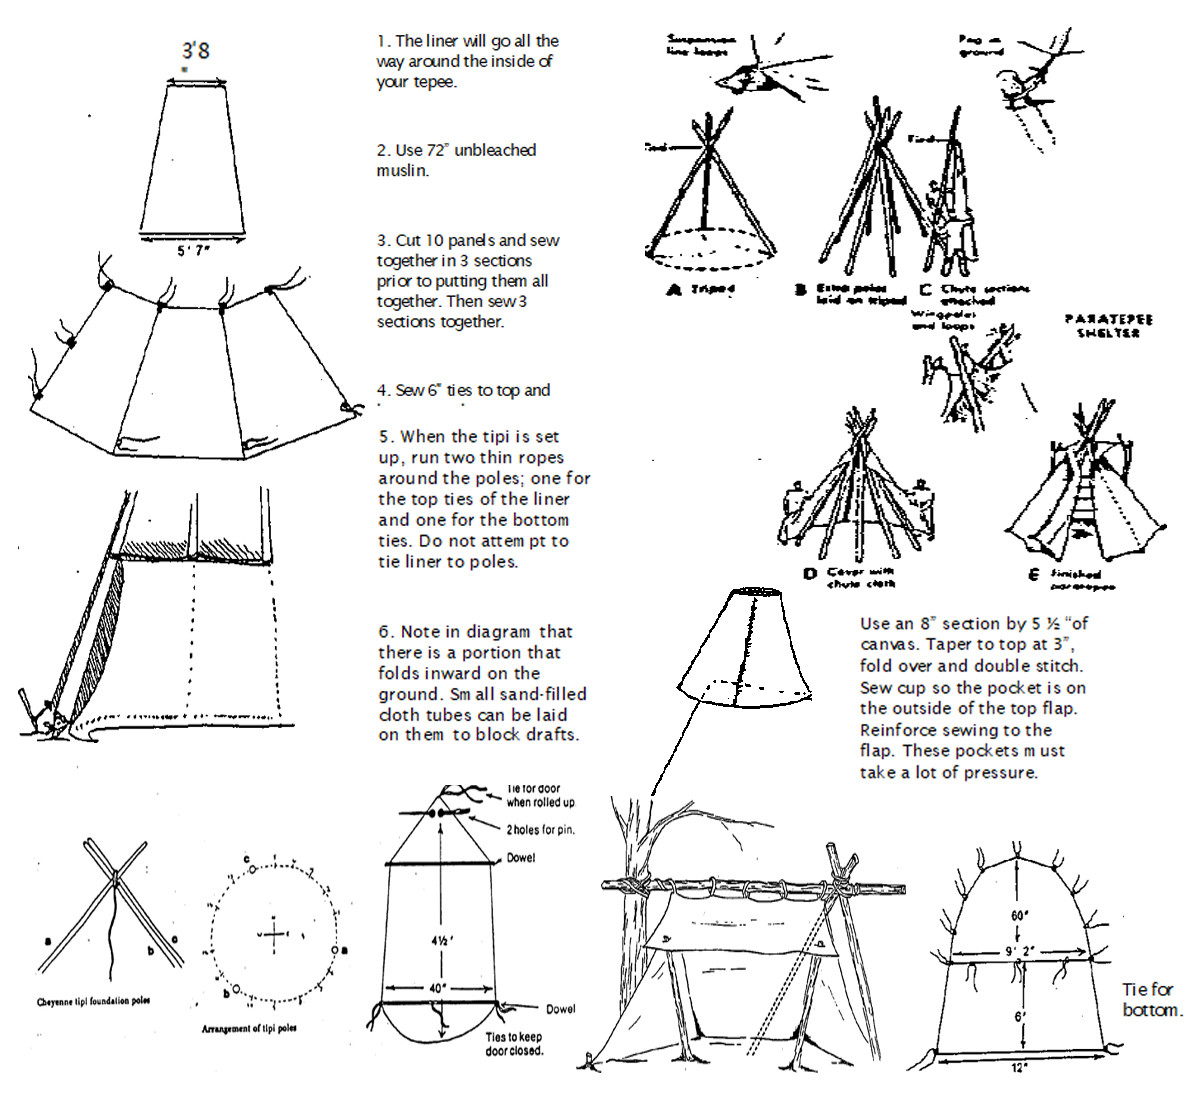
When stretched tightly, parachute material is water-repellent and durable, and it can be made into an excellent shelter. Like a tarp, it can be arranged in a variety of configurations, such as the lean-to above or the tepee at right. Since parachutes often have colors easily seen from the air, the shelter may aid in rescue as well.
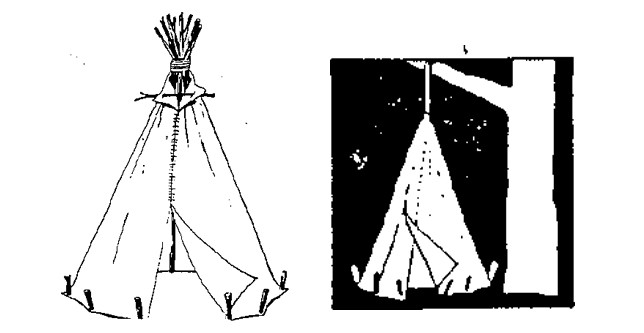
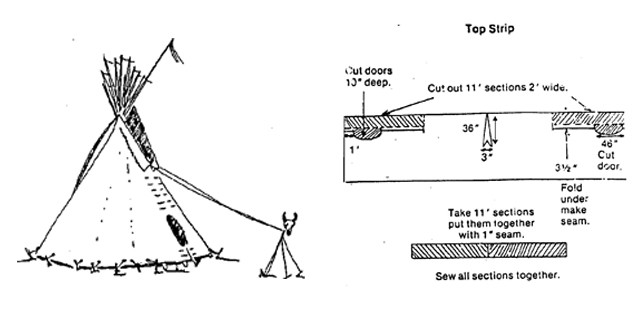
PARACHUTE TEPEE A parachute, suspended by its center, makes an instant tepee. Peg out the bottom edge.
Parachute material can be used to cover a tepee, but even simpler is to suspend one from a tree. Give the sides a steep angle and even when the fabric is not impervious, water will run off. Fold a segment of the parachute; double for a door flap, slit along a seam and make a tie fastening to close it.
Lay out the canvas on a flat surface, such as a large driveway or use a gym floor, take a heavy chord that doesn't stretch much; have one person hold it on end of flaps while the other person marks it with an attached pencil.
DEWCLOTH LINER
Your tipi will not function properly without this liner!
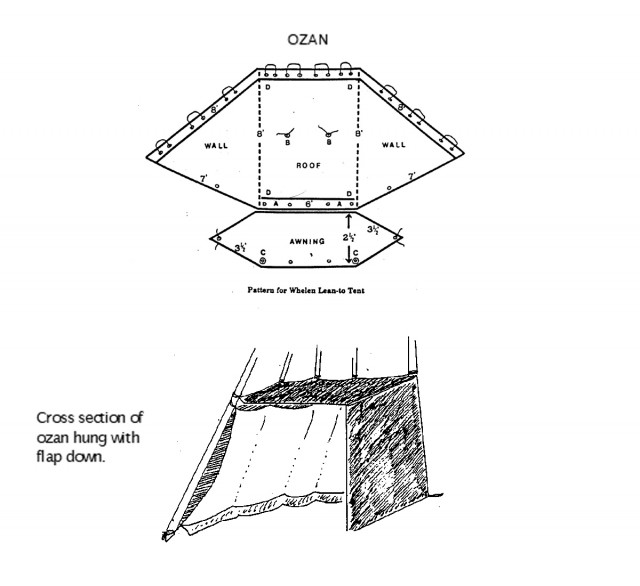
OZAN
The ozan acts as an inner roof and will help retain heat, plus give you some privacy when wanted.
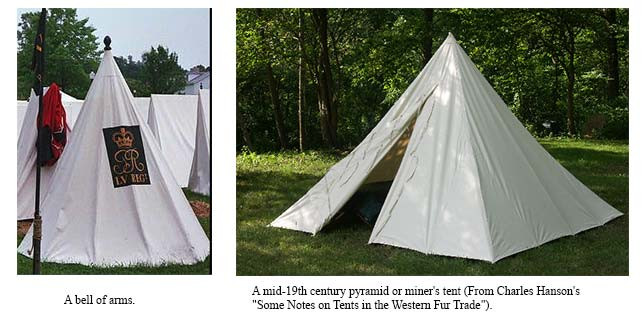
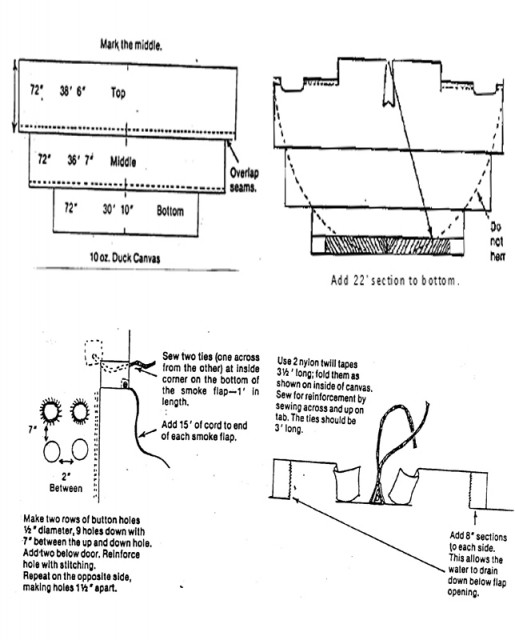
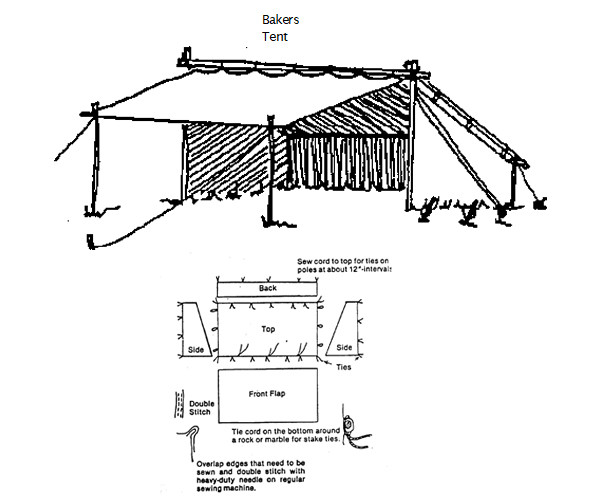
Bakers Tent
1. Use 72", 10 oz. canvas, 16 yards long.
2. Enough cord for ties.
3. 4 poles for front, 2 for top, 2 for sides.
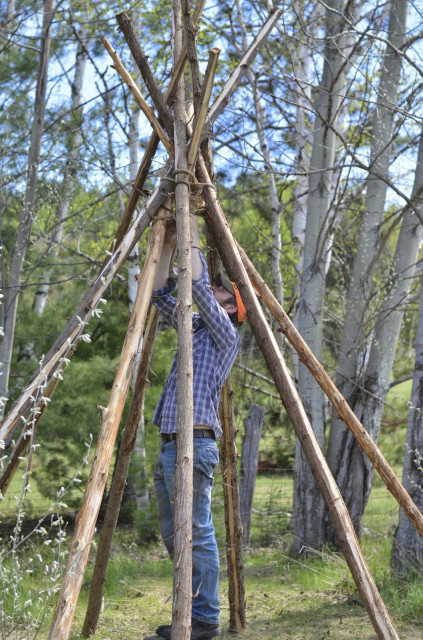
THE WICKIUP
Spontaneous Shelters in the Great Basin
Primitive peoples combined their human needs and ingenuity with the natural resources around them to develop shelters most suited to their lifestyles within their natural environments. Thus, the bison hide tipi (in many ways a wickiup carried to ultimate refinement) developed by nomadic horsemen of the Plains was warm, secure and adequately large, yet was dismantled and packed away in minutes should the camp suddenly need to move. The split cedar plank longhouse of the sedentary whalers and fishermen of the Northwest Coast was often structurally massive; necessarily storm proof, and unmovable. While both of these shelter types were well adapted to their environments and uses, the manufacture of each was quite a process—the raw materials had to be obtained, then skillfully and patiently processed before they could be assembled into shelters.
We next dragged in many more poles and leaned them against the original tripod. Wherever possible, we jammed and wedged them into position for greater solidarity. The large ends were butted into the ground, enclosing a circular inside-floor area about ten feet across. The inside height at the center was about five feet. Smaller sticks and branches were leaned or interwoven into the spaces between the larger poles. For the doorway at the front we left open a four-foot high, rectangular space between the larger poles. The covering or thatching should start at the bottom of the framework and progress upward so the layering effect will shed precipitation. If rain is imminent, one would be wise to construct a steeper walled wickiup than ours, but rain is generally nonexistent during the winter months in the Great Basin. Since temperatures were below zero much of the time, we were more concerned with protection from the wind. Although we achieved the desired end, we somewhat backwardly began thatching at the top of our frame and worked down; shoving successive bunches of mostly dead rabbit-bush and sagebrush under those above.
Depending on what is locally available where one builds a wickiup in northern desert areas, coverings, can be bundles of grasses or marsh plants, sage and rabbit bush as we used, juniper and other boughs, shredded bark; any materials having some density and bulk. Dirt, rocks and more brush are piled around the base to further block drafts. Additional poles can be leaned against the thatching to keep it from blowing off. If available, tarps or blankets can be used for further coverings. Almost anything piled on a wickiup frame will increase its weatherproofness. We eventfully laid a poncho on the windward side of our wickiup and held it in place with poles. As darkness arrived and the snow fell harder, we finished.
Partially completed wickiup frame of cottonwood poles.
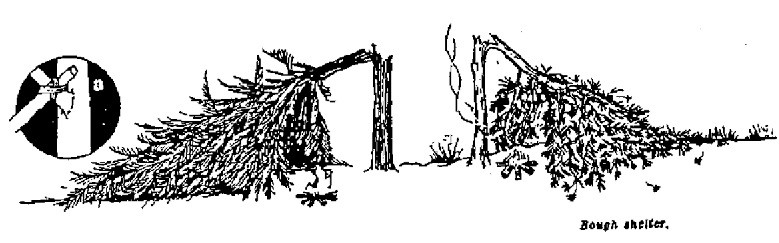
BOUGH SHELTER
Make use of branches that sweep down to the ground or boughs that have partly broken from the tree to give basic protection from the wind, but make sure that they are not so broken that they could come down on your head! Weave in other twigs to make the cover denser. Conifers are more suited to this technique than broad-leaved trees, as they require less weaving-in to keep out rain. Make a similar shelter by lashing a broken-off bough to the base of another branch where it forks from the trunk (a).
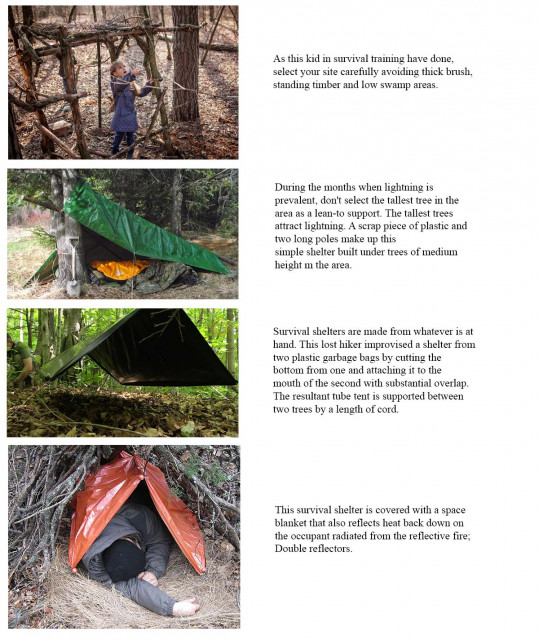
If no other shelter is available, a fallen tree can be made into a fair lean-to by cutting away branches on top and directly underneath. Use those branches and foliage to insulate and cushion the floor, improve the roof, and provide windbreak. A reflective fire at the opening can make such a shelter relatively comfortable. Enter your text here ...
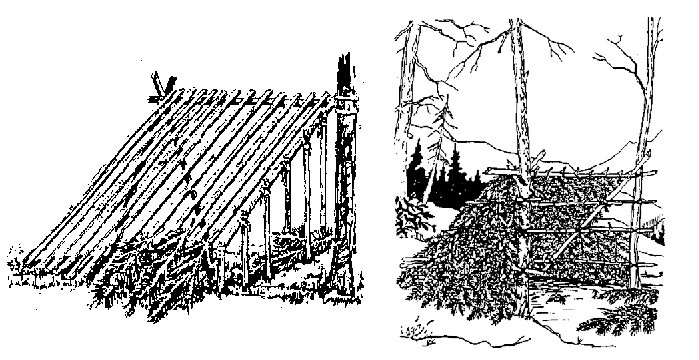
This bough shelter consists of a frame of a ridgepole lashed to shear poles. Boughs are placed similarly to those in A-shelter.
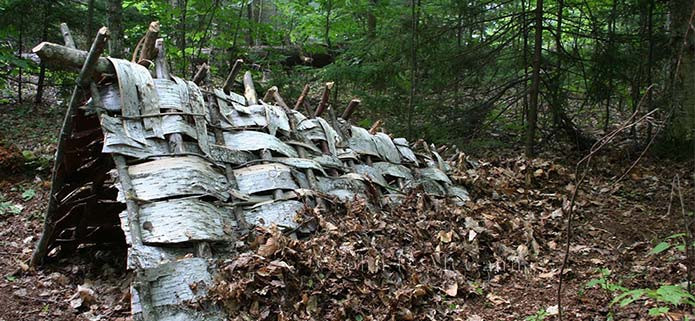
A-frame shelter using bark as covering.
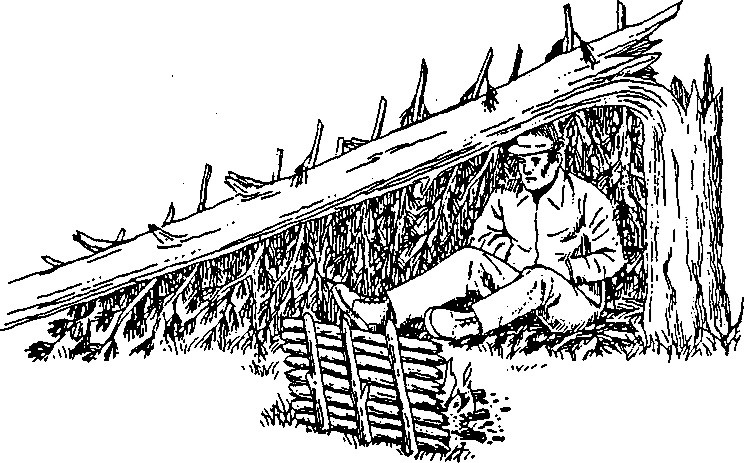
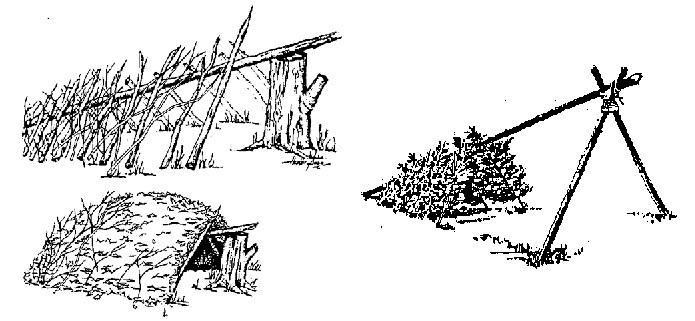
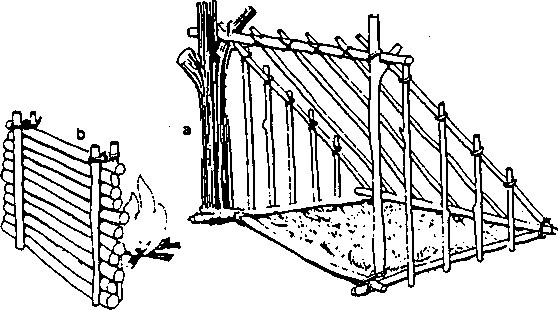
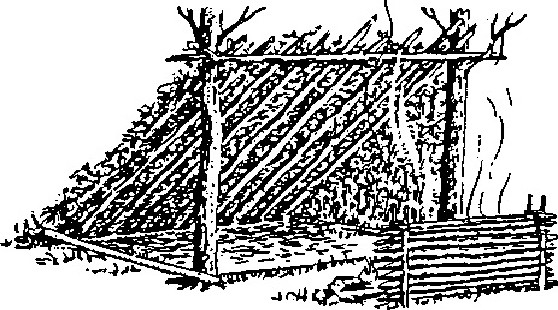
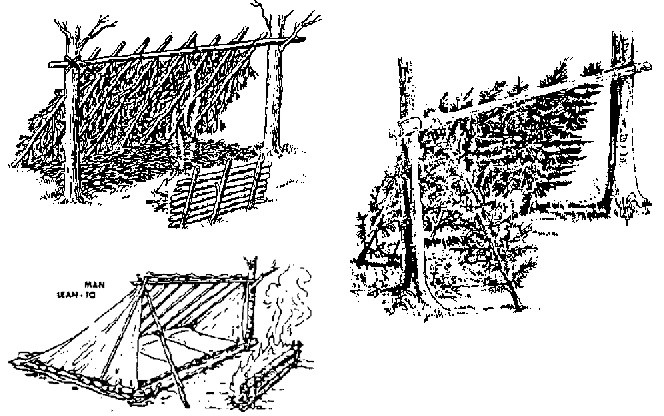
OPEN LEAN-TO SHELTER
If there is nothing solid to lean a roof against and you are not trying to keep out heavy rain or a blizzard, use panels of wattle or frames covered in grass for protection. Erect a horizontal cross-piece between trees or on simple supports. On the windward side lean a panel of wattle, or tie or lean saplings at 45 degrees to make a roof. Add side walls as necessary (a). Site your fire on the leeward. Add side pieces and, this is the trick; build a reflector (b) on the other side of the fire to make sure that you get the full benefit of the warmth.
METHOD OF PITCHING A LEAN-TO
The lean-to is the standard timber shelter. When using a lean-to, however, it is important that you be tactically located where you can build a fire large enough to spread warmth equally throughout the shelter. The proper placing of the lean-to and fire in relation to prevailing winds is another consideration. This shelter can be improved by the use of a fire and reflector, which is built of green logs and placed on the opposite side of the fire from the opening of the lean-to. Large stones stacked behind the fire also reflect heat.
Place sloping poles close together along a ridgepole to make a bough lean-to. Starting at the bottom, lay boughs with butts upward, overlapping them like shingles.
This lean-to is made from native materials including saplings cut for support beams, as well as leaves and brush that provide protection from sun, wind, and rain. If a space blanket, tarp, garbage bag or other waterproof material is available; it could be used in place of leaves or under the leaves for a much more effective cover. A reflective fire, as shown, can help ensure that a lean-to is relatively warm.
3 Evergreen boughs form the sides of this A-shelter. The butts are sharpened and driven into the ground.
SAPLING SHELTER
If suitable sapling growth is available, select two lines of saplings, clear the ground between them of any obstructions and lash their tops together to form a support frame for sheeting. Weight down the bottom edges of the sheeting with rocks or timber. You can make a similar shelter from pliable branches driven into the ground.
If you lack sheeting, choose or place saplings closer together, weave branches between them and consolidate with ferns and turf.
STICK WALLS AND SCREENS
It is easy to build walls by piling sticks between uprights driven into the ground and (if possible) tied at the top. Caulk them well to keep out wind and rain. These are ideal for making one side of a shelter, for blocking a shelter's opening or for a heat reflector behind a fire. If large rocks are not available use this method to dam a stream. To make a very sturdy stick wall, increase the space between the uprights, use two stacks of sticks and, as you build it, fill the space between with earth.
COVERINGS
Make wattle and woven coverings for roofs or walls from springy saplings, plant stems, grasses and long leaves (either whole or, if large enough, shredded for tighter weaving). First make a framework from less pliable materials, either in situ or as a separate panel to attach later. Tie the main struts in position. Weave in the more pliant materials.
If no ties are available, drive vertical stakes into the ground and weave saplings between them. Caulk with earth and grasses. If suitable firm cross pieces are too few, weave creepers between the uprights.
Very large leaves lashed or weighted down, or hooked over lines of creeper, can be overlapped like tiles or shingles to keep out rain.
STONE BARRIERS
A shelter is more comfortable if you can sit rather than lie in it, so increase its height by building a low wall of stones around your chosen hollow or shallow excavation. Caulk between the stones (especially the lowest layer) with turf and foliage mixed with mud, and deflect the flow of rainwater around the shelter as shown below.
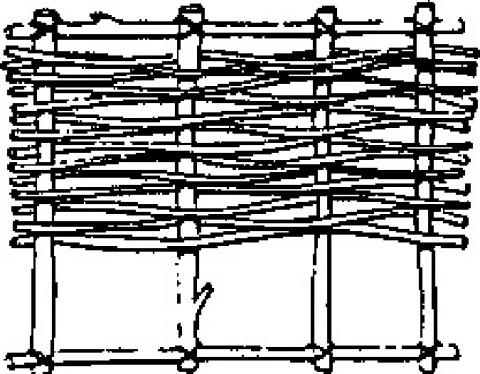
Long grass can be bunched and woven, overlap the ends irregularly to make a continuous warp and weft. Or use birch bark to make shingles. Ring a birch tree with even 60cm (2 ft) cuts and carefully remove the bark (a). Across a frame fix pairs of canes or creepers in close-spaced pairs (b). Upper ends of shingles are gripped between the canes, the lower ends rest on top of those below (c).
USE A NATURAL HOLLOW
Even a shallow depression in the ground will provide some protection from wind and can reduce the effort in constructing a shelter. However, take measures to deflect the downhill flow of water around it, especially if it is a hollow on a slope, or you could find yourself lying in a pool. Make a roof to keep the rain off and the warmth in. A few strong branches placed across the hollow can support a light log laid over them, against which shorter boughs and sticks can be stacked to give pitch to the roof and so allow water to run off. Consolidate with turf or with twigs and leaves.
FALLEN TRUNKS
A log or fallen tree trunk makes a useful windbreak on its own, if it is at the right angle to the wind. With a small trunk, scoop out a hollow in the ground on the leeward side. A log also makes an excellent support for a lean-to roof of boughs.